You will build a small tic-tac-toe game during this tutorial. This tutorial does not assume any existing React knowledge. The techniques you’ll learn in the tutorial are fundamental to building any React app, and fully understanding it will give you a deep understanding of React. 이 자습서에서는 작은 틱택토 게임을 만들 것입니다. 이 자습서는 현재 사용되는 React 지식을 전제로 하지 않습니다. 이 자습서에서 배우게 될 기술은 모든 React 앱을 빌드하는데 기본이 되는 기술이며, 이를 완전히 이해하면 React에 대해 깊이 이해할 수 있습니다.
The tutorial is divided into several sections: 자습서는 여러 섹션으로 나뉩니다:
- Setup for the tutorial will give you a starting point to follow the tutorial.
- Overview will teach you the fundamentals of React: components, props, and state.
- Completing the game will teach you the most common techniques in React development.
- Adding time travel will give you a deeper insight into the unique strengths of React.
What are you building?무엇을 만들까요?
In this tutorial, you’ll build an interactive tic-tac-toe game with React. 이 자습서에서는 React로 대화형 틱택토 게임을 빌드해 볼 것입니다.
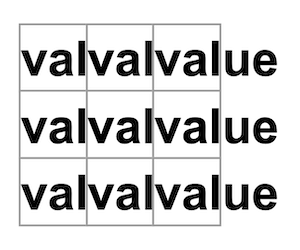
You can see what it will look like when you’re finished here: 완성되면 어떤 모습일지 여기에서 확인할 수 있습니다:
import { useState } from 'react';

function Square({ value, onSquareClick }) {
  return (
    <button className="square" onClick={onSquareClick}>
      {value}
    </button>
  );
}

function Board({ xIsNext, squares, onPlay }) {
  function handleClick(i) {
    if (calculateWinner(squares) || squares[i]) {
      return;
    }
    const nextSquares = squares.slice();
    if (xIsNext) {
      nextSquares[i] = 'X';
    } else {
      nextSquares[i] = 'O';
    }
    onPlay(nextSquares);
  }

  const winner = calculateWinner(squares);
  let status;
  if (winner) {
    status = 'Winner: ' + winner;
  } else {
    status = 'Next player: ' + (xIsNext ? 'X' : 'O');
  }

  return (
    <>
      <div className="status">{status}</div>
      <div className="board-row">
        <Square value={squares[0]} onSquareClick={() => handleClick(0)} />
        <Square value={squares[1]} onSquareClick={() => handleClick(1)} />
        <Square value={squares[2]} onSquareClick={() => handleClick(2)} />
      </div>
      <div className="board-row">
        <Square value={squares[3]} onSquareClick={() => handleClick(3)} />
        <Square value={squares[4]} onSquareClick={() => handleClick(4)} />
        <Square value={squares[5]} onSquareClick={() => handleClick(5)} />
      </div>
      <div className="board-row">
        <Square value={squares[6]} onSquareClick={() => handleClick(6)} />
        <Square value={squares[7]} onSquareClick={() => handleClick(7)} />
        <Square value={squares[8]} onSquareClick={() => handleClick(8)} />
      </div>
    </>
  );
}

export default function Game() {
  const [history, setHistory] = useState([Array(9).fill(null)]);
  const [currentMove, setCurrentMove] = useState(0);
  const xIsNext = currentMove % 2 === 0;
  const currentSquares = history[currentMove];

  function handlePlay(nextSquares) {
    const nextHistory = [...history.slice(0, currentMove + 1), nextSquares];
    setHistory(nextHistory);
    setCurrentMove(nextHistory.length - 1);
  }

  function jumpTo(nextMove) {
    setCurrentMove(nextMove);
  }

  const moves = history.map((squares, move) => {
    let description;
    if (move > 0) {
      description = 'Go to move #' + move;
    } else {
      description = 'Go to game start';
    }
    return (
      <li key={move}>
        <button onClick={() => jumpTo(move)}>{description}</button>
      </li>
    );
  });

  return (
    <div className="game">
      <div className="game-board">
        <Board xIsNext={xIsNext} squares={currentSquares} onPlay={handlePlay} />
      </div>
      <div className="game-info">
        <ol>{moves}</ol>
      </div>
    </div>
  );
}

function calculateWinner(squares) {
  const lines = [
    [0, 1, 2],
    [3, 4, 5],
    [6, 7, 8],
    [0, 3, 6],
    [1, 4, 7],
    [2, 5, 8],
    [0, 4, 8],
    [2, 4, 6],
  ];
  for (let i = 0; i < lines.length; i++) {
    const [a, b, c] = lines[i];
    if (squares[a] && squares[a] === squares[b] && squares[a] === squares[c]) {
      return squares[a];
    }
  }
  return null;
}
If the code doesn’t make sense to you yet, or if you are unfamiliar with the code’s syntax, don’t worry! The goal of this tutorial is to help you understand React and its syntax. 코드가 아직 이해가 되지 않거나, 코드 문법이 익숙하지 않더라도 걱정하지 마세요! 이 자습서의 목표는 React와 그 문법을 이해하는데 도움을 주는 것입니다.
We recommend that you check out the tic-tac-toe game above before continuing with the tutorial. One of the features that you’ll notice is that there is a numbered list to the right of the game’s board. This list gives you a history of all of the moves that have occurred in the game, and it is updated as the game progresses. 자습서를 계속하기 전에 위의 틱택토 게임을 확인하세요. 눈에 띄는 기능 중 하나는 게임판 오른쪽에 번호가 매겨진 목록이 있다는 것입니다. 이 목록은 게임에서 발생한 모든 움직임의 history를 제공하며, 게임이 진행됨에 따라 업데이트됩니다.
Once you’ve played around with the finished tic-tac-toe game, keep scrolling. You’ll start with a simpler template in this tutorial. Our next step is to set you up so that you can start building the game. 완성된 틱택토 게임을 플레이해 보셨다면, 계속해서 스크롤하세요. 이 자습서에서는 더 간단한 템플릿으로 시작합니다. 다음 단계는 게임 제작을 시작할 수 있도록 설정하는 것입니다.
Setup for the tutorial자습을 위한 설정
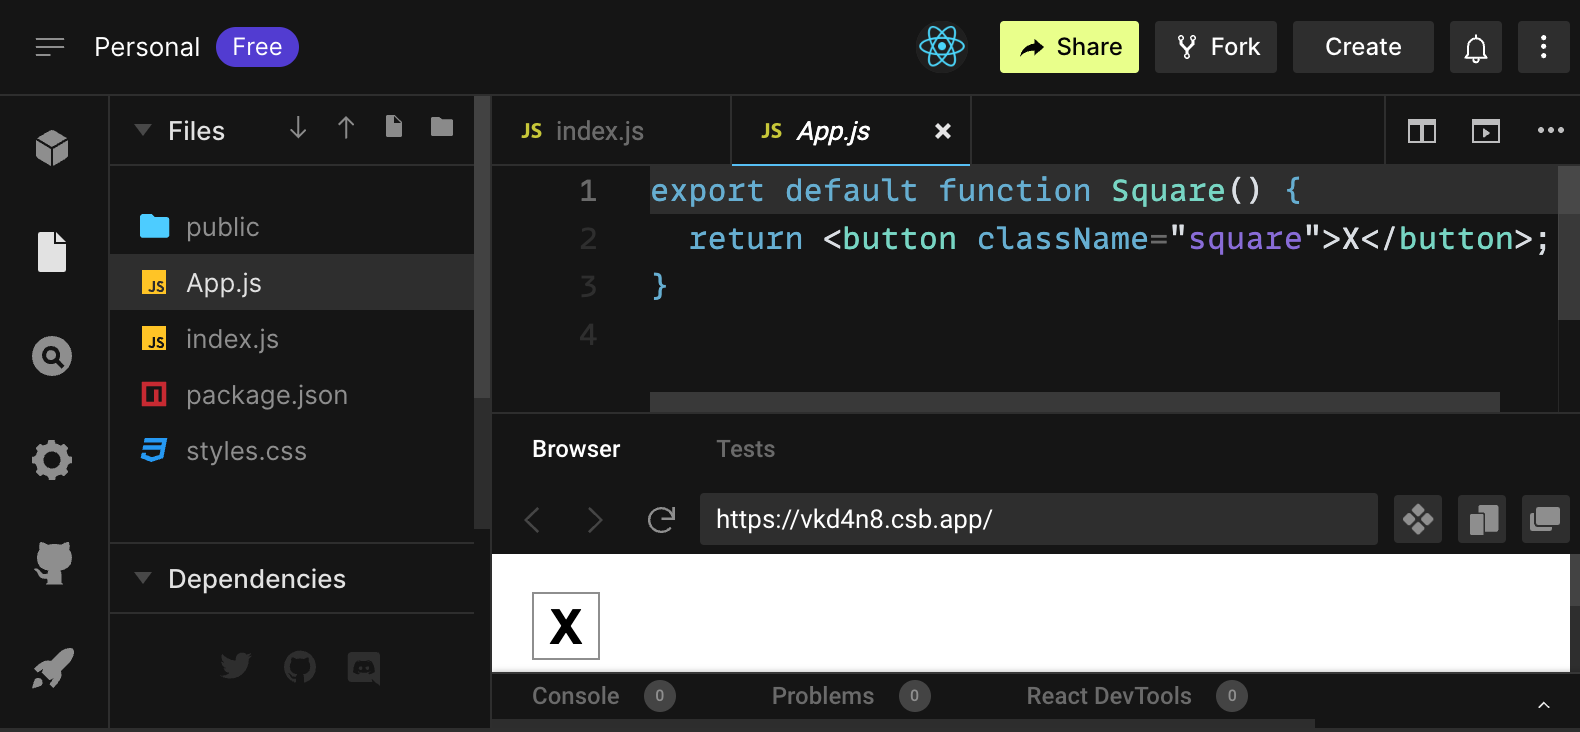
In the live code editor below, click Fork in the top-right corner to open the editor in a new tab using the website CodeSandbox. CodeSandbox lets you write code in your browser and preview how your users will see the app you’ve created. The new tab should display an empty square and the starter code for this tutorial. 아래의 라이브 코드 편집기에서 오른쪽 상단의 Fork 버튼을 클릭하여 새 탭에서 CodeSandBox를 이용한 편집기를 열어주세요. CodeSandBox를 사용하면 브라우저에서 코드를 작성할 수 있으며 사용자가 만든 앱이 어떻게 보여지는지 즉시 확인할 수 있습니다. 새 탭에는 빈 사각형과 이 자습서의 시작 코드가 표시되어야 합니다.
export default function Square() {
  return <button className="square">X</button>;
}
Overview개요
Now that you’re set up, let’s get an overview of React! 이제 설정이 완료되었으니, React에 대한 개요를 살펴보겠습니다!
Inspecting the starter code초기 코드 살펴보기
In CodeSandbox you’ll see three main sections: CodeSandbox에는 세 가지 주요 섹션이 있습니다:
- The Files section with a list of files like
App.js,index.js,styles.cssand a folder calledpublic - The code editor where you’ll see the source code of your selected file
- The browser section where you’ll see how the code you’ve written will be displayed
App.js,index.js,styles.css와 같은 파일 목록이 있는 파일 섹션 과public폴더가 있습니다.- 선택한 파일의 소스 코드를 볼 수 있는 코드 편집기
- 작성한 코드가 어떻게 표시되는지 확인할 수 있는 브라우저 섹션
The App.js file should be selected in the Files section. The contents of that file in the code editor should be:
파일 섹션에서 App.js 파일을 선택하세요. 코드 편집기 에서 해당 파일의 내용이 있어야 합니다:
export default function Square() {
  return <button className="square">X</button>;
}
The browser section should be displaying a square with a X in it like this: 브라우저 섹션에 다음과 같이 X가 표시된 사각형이 표시되어야 합니다:

Now let’s have a look at the files in the starter code. 이제 초기 코드의 파일을 살펴보겠습니다.
App.js
The code in App.js creates a component. In React, a component is a piece of reusable code that represents a part of a user interface. Components are used to render, manage, and update the UI elements in your application. Let’s look at the component line by line to see what’s going on:
App.js의 코드는 컴포넌트 를 생성합니다. React에서는 컴포넌트가 사용자 인터페이스의 일부를 표시하는 재사용 가능한 코드 조각입니다. 컴포넌트는 애플리케이션의 UI 엘리먼트를 렌더링, 관리, 업데이트하는 데 사용됩니다. 컴포넌트를 한 줄씩 살펴보면서 무슨 일이 일어나는지 살펴보겠습니다:
export default function Square() {
  return <button className="square">X</button>;
}
The first line defines a function called Square. The export JavaScript keyword makes this function accessible outside of this file. The default keyword tells other files using your code that it’s the main function in your file.
첫 번째 줄은 Square 함수를 정의합니다. JavaScript의 export 키워드를 사용하면 이 함수를 파일 외부에서 접근할 수 있습니다. default 키워드는 코드를 사용하는 다른 파일에서 이 함수가 파일의 주요 함수임을 알려줍니다.
export default function Square() {
  return <button className="square">X</button>;
}
The second line returns a button. The return JavaScript keyword means whatever comes after is returned as a value to the caller of the function. <button> is a JSX element. A JSX element is a combination of JavaScript code and HTML tags that describes what you’d like to display. className="square" is a button property or prop that tells CSS how to style the button. X is the text displayed inside of the button and </button> closes the JSX element to indicate that any following content shouldn’t be placed inside the button.
두 번째 줄은 버튼을 반환합니다. JavaScript의 return 키워드는 뒤에 오는 모든 것이 함수 호출자에게 값으로 반환됨을 의미합니다. <button>은 JSX 엘리먼트입니다. JSX 엘리먼트는 JavaScript 코드와 HTML 태그들의 조합으로, 표시할 내용을 설명합니다. className="square"는 버튼 prop 또는 프로퍼티로, CSS에 버튼의 스타일을 지정하는 방법을 알려줍니다. X는 버튼 내부에 표시되는 텍스트이며, </button>은 JSX 엘리먼트를 닫아 버튼 내부에 다음 콘텐츠를 배치해서는 안 됨을 나타냅니다.
styles.css
Click on the file labeled styles.css in the Files section of CodeSandbox. This file defines the styles for your React app. The first two CSS selectors (* and body) define the style of large parts of your app while the .square selector defines the style of any component where the className property is set to square. In your code, that would match the button from your Square component in the App.js file.
CodeSandBox의 파일 섹션에서 styles.css라는 이름의 파일을 클릭하세요. 이 파일은 React 앱의 스타일을 정의합니다. 처음 두 개의 CSS 선택자 (*와 body)는 앱의 대부분의 스타일을 정의하고, .square 선택자는 className 프로퍼티가 square로 설정된 모든 컴포넌트의 스타일을 정의합니다. 코드에서는 App.js 파일의 사각형 컴포넌트의 버튼과 일치합니다.
index.js
Click on the file labeled index.js in the Files section of CodeSandbox. You won’t be editing this file during the tutorial but it is the bridge between the component you created in the App.js file and the web browser.
CodeSandBox의 파일 섹션에서 index.js라는 이름의 파일을 클릭하세요. 자습서를 진행하는 중에는 이 파일을 편집하지 않지만 이 파일은 App.js 파일에서 만든 컴포넌트와 웹 브라우저 사이의 다리 역할을 합니다.
import { StrictMode } from 'react';
import { createRoot } from 'react-dom/client';
import './styles.css';

import App from './App';
Lines 1-5 bring all the necessary pieces together: 1-5줄은 필요한 모든 조각들을 한 곳으로 모았습니다:
- React
- React’s library to talk to web browsers (React DOM)
- the styles for your components
- the component you created in
App.js.
- React
- 웹 브라우저와 상호작용하는 React의 라이브러리(React DOM)
- 컴포넌트의 스타일
App.js에서 만들어진 컴포넌트.
The remainder of the file brings all the pieces together and injects the final product into index.html in the public folder.
나머지 파일은 모든 조각을 한데 모아 최종 결과물을 public 폴더의 index.html에 주입합니다.
Building the board보드 만들기
Let’s get back to App.js. This is where you’ll spend the rest of the tutorial.
다시 App.js로 돌아가 보겠습니다. 이 자습서의 나머지 부분은 여기서 진행하겠습니다.
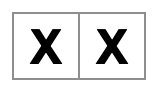
Currently the board is only a single square, but you need nine! If you just try and copy paste your square to make two squares like this: 현재 보드에서는 사각형이 하나뿐이지만, 9개가 필요합니다! 간단하게 사각형을 복사해서 붙여넣기 해보면 이렇게 두 개의 사각형을 만들 수 있습니다:
export default function Square() {
  return <button className="square">X</button><button className="square">X</button>;
}
You’ll get this error: 이 오류가 표시됩니다:
<>...</>?
/src/App.js: 인접한 JSX 요소는 둘러싸는 태그로 묶어야 합니다. JSX fragment <>...</>를 원하시나요?React components need to return a single JSX element and not multiple adjacent JSX elements like two buttons. To fix this you can use fragments (<> and </>) to wrap multiple adjacent JSX elements like this:
React 컴포넌트는 두 개의 버튼처럼 인접한 여러 개의 JSX 엘리먼트가 아닌 단일 JSX 엘리먼트를 반환해야 합니다. 이 문제를 해결하려면 fragments(<> 와 </>)를 사용하여 다음과 같이 여러 개의 인접한 JSX 엘리먼트를 감쌀 수 있습니다:
export default function Square() {
  return (
    <>
      <button className="square">X</button>
      <button className="square">X</button>
    </>
  );
}
Now you should see: 이제 이렇게 표시됩니다:
Great! Now you just need to copy-paste a few times to add nine squares and… 훌륭합니다! 이제 간단히 복사-붙여넣기 몇 번만 하면 9개의 사각형을 추가할 수 있습니다. 그리고…

Oh no! The squares are all in a single line, not in a grid like you need for our board. To fix this you’ll need to group your squares into rows with divs and add some CSS classes. While you’re at it, you’ll give each square a number to make sure you know where each square is displayed.
이런! 사각형이 모두 한 줄로 되어 있고 게임판에 필요한 격자가 아닙니다. 이 문제를 해결하려면 div를 사용하여 사각형을 행으로 그룹화하고 몇 가지 CSS 클래스를 추가해야 합니다. 이 과정에서 각 사각형에 번호를 부여하여 각 사각형이 표시되는 위치를 알 수 있도록 하겠습니다.
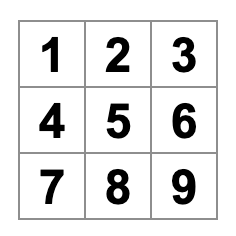
In the App.js file, update the Square component to look like this:
App.js 파일에서 Square 컴포넌트를 다음과 같이 업데이트하세요:
export default function Square() {
  return (
    <>
      <div className="board-row">
        <button className="square">1</button>
        <button className="square">2</button>
        <button className="square">3</button>
      </div>
      <div className="board-row">
        <button className="square">4</button>
        <button className="square">5</button>
        <button className="square">6</button>
      </div>
      <div className="board-row">
        <button className="square">7</button>
        <button className="square">8</button>
        <button className="square">9</button>
      </div>
    </>
  );
}
The CSS defined in styles.css styles the divs with the className of board-row. Now that you’ve grouped your components into rows with the styled divs you have your tic-tac-toe board:
styles.css에 정의된 CSS는 board-row라는 className으로 지정된 div들의 스타일을 지정합니다. 이제 스타일된 div를 사용하여 컴포넌트를 행으로 그룹화하여 틱택토 보드를 완성했습니다:
But you now have a problem. Your component named Square, really isn’t a square anymore. Let’s fix that by changing the name to Board:
하지만 이제 문제가 발생했습니다. Square로 이름 지어진 컴포넌트가 더 이상 하나의 square가 아닙니다. 이 문제를 해결하기 위해 Board로 이름을 변경하겠습니다:
export default function Board() {
  //...
}
At this point your code should look something like this: 이 시점에서 코드는 다음과 같이 표시되어야 합니다:
export default function Board() {
  return (
    <>
      <div className="board-row">
        <button className="square">1</button>
        <button className="square">2</button>
        <button className="square">3</button>
      </div>
      <div className="board-row">
        <button className="square">4</button>
        <button className="square">5</button>
        <button className="square">6</button>
      </div>
      <div className="board-row">
        <button className="square">7</button>
        <button className="square">8</button>
        <button className="square">9</button>
      </div>
    </>
  );
}
Passing data through propsprops를 통해 데이터 전달하기
Next, you’ll want to change the value of a square from empty to “X” when the user clicks on the square. With how you’ve built the board so far you would need to copy-paste the code that updates the square nine times (once for each square you have)! Instead of copy-pasting, React’s component architecture allows you to create a reusable component to avoid messy, duplicated code. 다음으로, 사용자가 사각형을 클릭할 때 사각형의 값을 비어있는 상태에서 “X”로 변경하고 싶을 것입니다. 지금까지 보드를 구축한 방식으로는 사각형을 업데이트하는 코드를 9번(각 사각형당 한번) 복사해서 붙여넣어야 합니다! 복사-붙여넣기 대신, React의 컴포넌트 아키텍처를 사용하면 재사용 가능한 컴포넌트를 만들어 지저분하고 중복된 코드를 피할 수 있습니다.
First, you are going to copy the line defining your first square (<button className="square">1</button>) from your Board component into a new Square component:
먼저, Board 컴포넌트에서 첫 번째 사각형을 정의하는 줄(<button className="square">1</button>)을 새 Square에 복사하세요:
function Square() {
  return <button className="square">1</button>;
}

export default function Board() {
  // ...
}
Then you’ll update the Board component to render that Square component using JSX syntax:
다음으로, 보드 컴포넌트를 JSX 문법을 사용하여 해당 Square 컴포넌트를 렌더링하도록 수정하세요:
// ...
export default function Board() {
  return (
    <>
      <div className="board-row">
        <Square />
        <Square />
        <Square />
      </div>
      <div className="board-row">
        <Square />
        <Square />
        <Square />
      </div>
      <div className="board-row">
        <Square />
        <Square />
        <Square />
      </div>
    </>
  );
}
Note how unlike the browser divs, your own components Board and Square must start with a capital letter.
브라우저의 div와 달리, 자체 컴포넌트인 Board와 Square는 대문자로 시작해야 한다는 점에 유의하세요.
Let’s take a look: 게임판을 살펴보겠습니다:
Oh no! You lost the numbered squares you had before. Now each square says “1”. To fix this, you will use props to pass the value each square should have from the parent component (Board) to its child (Square).
이런! 이전에 가지고 있던 번호가 매겨진 사각형이 사라졌습니다. 이제 각 사각형은 “1”이라고 표시됩니다. 이 문제를 해결하려면, props를 사용하여 각 사각형이 가져야 할 값을 부모 컴포넌트(Board)에서 자식 컴포넌트(Square)로 전달합니다.
Update the Square component to read the value prop that you’ll pass from the Board:
Square컴포넌트를 Board에서 전달할 prop value 를 읽도록 수정하세요:
function Square({ value }) {
  return <button className="square">1</button>;
}
function Square({ value }) indicates the Square component can be passed a prop called value.
function Square({ value })는 사각형 컴포넌트에 value라는 prop를 전달할 수 있음을 나타냅니다.
Now you want to display that value instead of 1 inside every square. Try doing it like this:
이제 모든 정사각형에 1 대신 value를 표시하고 싶습니다. 이렇게 해보세요:
function Square({ value }) {
  return <button className="square">value</button>;
}
Oops, this is not what you wanted: 이런, 원하던 것과는 다른 결과입니다:
You wanted to render the JavaScript variable called value from your component, not the word “value”. To “escape into JavaScript” from JSX, you need curly braces. Add curly braces around value in JSX like so:
컴포넌트에서 “value”라는 단어가 아닌 value 라는 JavaScript 변수를 렌더링 하고 싶었습니다. JSX에서 “JavaScript로 이스케이프”하려면, 중괄호가 필요합니다. JSX에서 value 주위에 중괄호를 다음과 같이 추가하세요:
function Square({ value }) {
  return <button className="square">{value}</button>;
}
For now, you should see an empty board: 지금은 빈 보드가 표기되어야 합니다:
This is because the Board component hasn’t passed the value prop to each Square component it renders yet. To fix it you’ll add the value prop to each Square component rendered by the Board component:
이유는 Board 컴포넌트가 렌더링하는 각 Square 컴포넌트에 value prop를 아직 전달하지 않았기 때문입니다. 이 문제를 해결하려면 Board 컴포넌트가 렌더링하는 각 Square 컴포넌트에 value prop를 추가하면 됩니다:
export default function Board() {
  return (
    <>
      <div className="board-row">
        <Square value="1" />
        <Square value="2" />
        <Square value="3" />
      </div>
      <div className="board-row">
        <Square value="4" />
        <Square value="5" />
        <Square value="6" />
      </div>
      <div className="board-row">
        <Square value="7" />
        <Square value="8" />
        <Square value="9" />
      </div>
    </>
  );
}
Now you should see a grid of numbers again: 이제 숫자가 있는 격자판이 다시 표시됩니다:
Your updated code should look like this: 수정된 코드는 다음과 같이 표시되어야 합니다:
function Square({ value }) {
  return <button className="square">{value}</button>;
}

export default function Board() {
  return (
    <>
      <div className="board-row">
        <Square value="1" />
        <Square value="2" />
        <Square value="3" />
      </div>
      <div className="board-row">
        <Square value="4" />
        <Square value="5" />
        <Square value="6" />
      </div>
      <div className="board-row">
        <Square value="7" />
        <Square value="8" />
        <Square value="9" />
      </div>
    </>
  );
}
Making an interactive component사용자와 상호작용하는 컴포넌트 만들기
Let’s fill the Square component with an X when you click it. Declare a function called handleClick inside of the Square. Then, add onClick to the props of the button JSX element returned from the Square:
이제 Square 컴포넌트를 클릭하면 X로 채워보겠습니다. Square 내부에 handleClick이라는 함수를 선언하세요. 그런 다음 Square 컴포넌트에서 반환된 버튼 JSX의 props에 onClick을 추가하세요:
function Square({ value }) {
  function handleClick() {
    console.log('clicked!');
  }

  return (
    <button
      className="square"
      onClick={handleClick}
    >
      {value}
    </button>
  );
}
If you click on a square now, you should see a log saying "clicked!" in the Console tab at the bottom of the Browser section in CodeSandbox. Clicking the square more than once will log "clicked!" again. Repeated console logs with the same message will not create more lines in the console. Instead, you will see an incrementing counter next to your first "clicked!" log.
이제 사각형을 클릭하면, CodeSandBox의 브라우저 섹션에 있는 콘솔 탭에 "clicked!" 라는 로그가 표시됩니다. 사각형을 한 번 이상 클릭하면 "clicked!" 라는 로그가 다시 생성됩니다. 동일한 메시지가 포함된 콘솔 로그를 반복해도 콘솔에 더 많은 줄이 생기지 않습니다. 대신 첫 번째 "clicked!" 로그 옆에 카운터가 증가하는 것을 볼 수 있습니다.
As a next step, you want the Square component to “remember” that it got clicked, and fill it with an “X” mark. To “remember” things, components use state. 다음 단계로, 사각형 컴포넌트가 클릭된 것을 “기억”하고 “X” 표시로 채우기를 원합니다. 컴포넌트는 무언가 “기억”하기 위해 state를 사용합니다.
React provides a special function called useState that you can call from your component to let it “remember” things. Let’s store the current value of the Square in state, and change it when the Square is clicked.
React는 컴포넌트에서 호출하여 무언가를 “기억”할 수 있는 useState라는 특별한 함수를 제공합니다. Square의 현재 값을 state에 저장하고 Square가 클릭되면 값을 변경해보도록 하겠습니다.
Import useState at the top of the file. Remove the value prop from the Square component. Instead, add a new line at the start of the Square that calls useState. Have it return a state variable called value:
파일 상단에서 useState를 추가하세요. 다음으로 사각형 컴포넌트에서 value prop을 제거하세요. 대신, Square 컴포넌트의 시작 부분에 useState를 호출하는 새 줄을 추가하세요. value라는 이름의 state 변수를 반환하도록 하세요:
import { useState } from 'react';

function Square() {
  const [value, setValue] = useState(null);

  function handleClick() {
    //...
value stores the value and setValue is a function that can be used to change the value. The null passed to useState is used as the initial value for this state variable, so value here starts off equal to null.
value는 값을 저장하고 setValue는 값을 변경하는 데 사용하는 함수입니다. useState에 전달된 null은 이 state 변수의 초기값으로 사용되므로, 여기서 value는 null과 같습니다.
Since the Square component no longer accepts props anymore, you’ll remove the value prop from all nine of the Square components created by the Board component:
Square 컴포넌트는 더 이상 props를 허용하지 않으므로, 보드 컴포넌트가 생성한 9개의 사각형 컴포넌트에서 value prop를 제거하겠습니다:
// ...
export default function Board() {
  return (
    <>
      <div className="board-row">
        <Square />
        <Square />
        <Square />
      </div>
      <div className="board-row">
        <Square />
        <Square />
        <Square />
      </div>
      <div className="board-row">
        <Square />
        <Square />
        <Square />
      </div>
    </>
  );
}
Now you’ll change Square to display an “X” when clicked. Replace the console.log("clicked!"); event handler with setValue('X');. Now your Square component looks like this:
이제 Square가 클릭되었을 때 “X”를 표시하도록 변경하겠습니다. console.log("clicked!"); 이벤트 핸들러를 setValue('X');로 변경하세요. 이제 Square 컴포넌트는 다음과 같습니다:
function Square() {
  const [value, setValue] = useState(null);

  function handleClick() {
    setValue('X');
  }

  return (
    <button
      className="square"
      onClick={handleClick}
    >
      {value}
    </button>
  );
}
By calling this set function from an onClick handler, you’re telling React to re-render that Square whenever its <button> is clicked. After the update, the Square’s value will be 'X', so you’ll see the “X” on the game board. Click on any Square, and “X” should show up:
이 과정은 onClick 핸들러에서 set 함수를 호출하면, 우리는 React에게 <button>이 클릭될 때마다 Square를 다시 렌더링하도록 지시한 것입니다. 업데이트 후, Square의 value는 'X'가 되므로, 앞으로 게임보드에서 “X”를 볼 수 있습니다. 아무 정사각형이나 클릭하면 “X”가 표시됩니다:
Each Square has its own state: the value stored in each Square is completely independent of the others. When you call a set function in a component, React automatically updates the child components inside too.
각 정사각형에는 고유한 state가 있습니다. 각 정사각형에 저장된 값은 다른 정사각형과 완전히 독립적입니다. 컴포넌트에서 set 함수를 호출하면 React는 그 안에 있는 자식 컴포넌트도 자동으로 업데이트합니다.
After you’ve made the above changes, your code will look like this: 위의 변경사항을 적용한 코드는 다음과 같습니다:
import { useState } from 'react';

function Square() {
  const [value, setValue] = useState(null);

  function handleClick() {
    setValue('X');
  }

  return (
    <button
      className="square"
      onClick={handleClick}
    >
      {value}
    </button>
  );
}

export default function Board() {
  return (
    <>
      <div className="board-row">
        <Square />
        <Square />
        <Square />
      </div>
      <div className="board-row">
        <Square />
        <Square />
        <Square />
      </div>
      <div className="board-row">
        <Square />
        <Square />
        <Square />
      </div>
    </>
  );
}
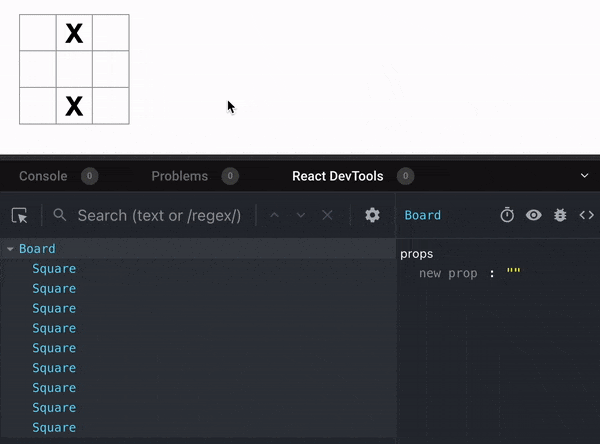
React Developer ToolsReact 개발자 도구
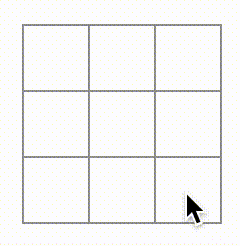
React DevTools let you check the props and the state of your React components. You can find the React DevTools tab at the bottom of the browser section in CodeSandbox: React 개발자 도구를 사용하면 props와 React 각 컴포넌트의 state를 확인할 수 있습니다. CodeSandBox의 브라우저 섹션 하단에서 React 개발자 도구 탭을 찾을 수 있습니다:
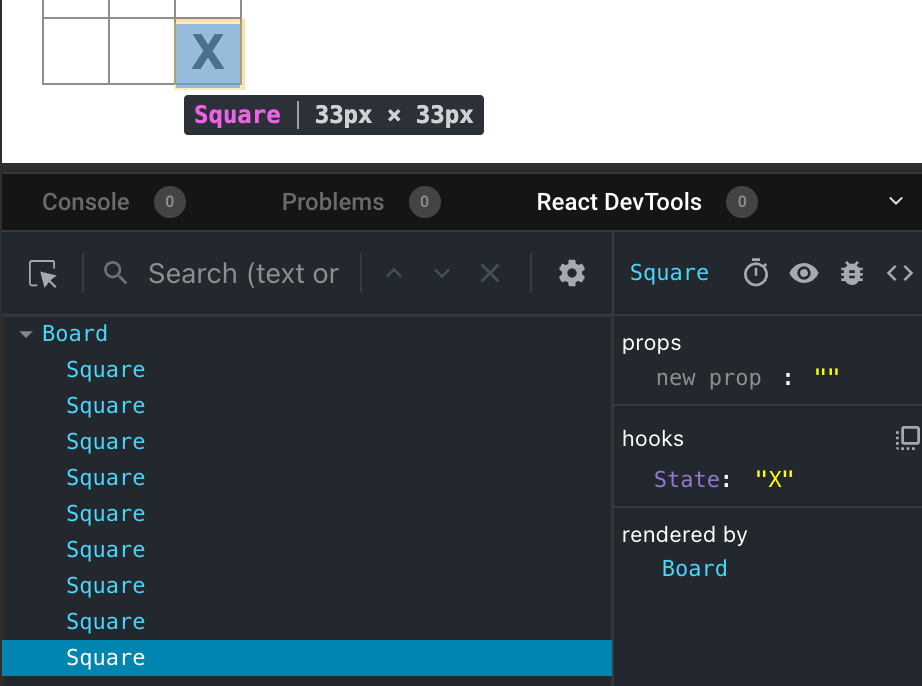
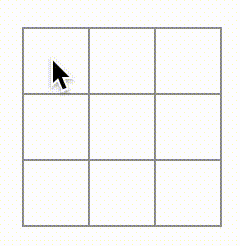
To inspect a particular component on the screen, use the button in the top left corner of React DevTools: 화면에서 특정 컴포넌트를 검사하려면 React 개발자 도구의 왼쪽 상단 모서리에 있는 버튼을 사용하세요:
Completing the game게임 완성하기
By this point, you have all the basic building blocks for your tic-tac-toe game. To have a complete game, you now need to alternate placing “X”s and “O”s on the board, and you need a way to determine a winner. 이제 틱택토 게임을 위한 기본적인 구성 요소는 모두 갖추었습니다. 게임을 완성하기 위해서는 보드에 “X”와 “O”를 번갈아 배치해야 하며, 승자를 결정할 방법이 필요합니다.
Lifting state upstate 끌어올리기
Currently, each Square component maintains a part of the game’s state. To check for a winner in a tic-tac-toe game, the Board would need to somehow know the state of each of the 9 Square components.
현재, 각 Square 컴포넌트는 게임 state의 일부를 유지합니다. 틱택토 게임에서 승자를 확인하려면, Board 가 9개의 Square 컴포넌트 각각의 state를 어떻게든 알고 있어야 합니다.
How would you approach that? At first, you might guess that the Board needs to “ask” each Square for that Square’s state. Although this approach is technically possible in React, we discourage it because the code becomes difficult to understand, susceptible to bugs, and hard to refactor. Instead, the best approach is to store the game’s state in the parent Board component instead of in each Square. The Board component can tell each Square what to display by passing a prop, like you did when you passed a number to each Square.
어떻게 접근하는 것이 좋을까요? 처음에는 Board가 각각의 Square에게 해당 Square의 state를 “요청”해야 한다고 생각할 수 있습니다. 이 접근 방식은 React에서 기술적으로는 가능하지만, 코드가 이해하기 어렵고, 버그에 취약하며, 리팩터링하기 어렵기 때문에 권장하지 않습니다. 대신, 가장 좋은 접근 방식은 게임의 state를 각 Square가 아닌 부모 Board 컴포넌트에 저장하는 것입니다. Board 컴포넌트는 각 사각형에 숫자를 전달했을 때와 같이 prop를 전달하여 각 Square에 표시할 내용을 지시할 수 있습니다.
To collect data from multiple children, or to have two child components communicate with each other, declare the shared state in their parent component instead. The parent component can pass that state back down to the children via props. This keeps the child components in sync with each other and with their parent. 여러 자식 컴포넌트에서 데이터를 수집하거나, 두 자식 컴포넌트가 서로 통신하도록 하려면, 부모 컴포넌트에서 공유 state를 대신 선언하세요. 부모 컴포넌트는 props를 통해 해당 state를 자식 컴포넌트에 다시 전달할 수 있습니다. 이렇게 하면 자식 컴포넌트가 서로 동기화되고 부모 컴포넌트와도 동기화되도록 유지할 수 있습니다.
Lifting state into a parent component is common when React components are refactored. React 컴포넌트를 리팩터링 할때, 부모 컴포넌트로 state를 끌어올리는 것이 일반적 방법입니다.
Let’s take this opportunity to try it out. Edit the Board component so that it declares a state variable named squares that defaults to an array of 9 nulls corresponding to the 9 squares:
이번 기회에 직접 사용해 보도록 하겠습니다. Board 컴포넌트를 편집하여 9개의 사각형에 해당하는 9개의 null 배열을 기본값으로 하는 squares라는 state 변수를 선언하세요.
// ...
export default function Board() {
  const [squares, setSquares] = useState(Array(9).fill(null));
  return (
    // ...
  );
}
Array(9).fill(null) creates an array with nine elements and sets each of them to null. The useState() call around it declares a squares state variable that’s initially set to that array. Each entry in the array corresponds to the value of a square. When you fill the board in later, the squares array will look like this:
Array(9).fill(null) 구문은 9개의 엘리먼트로 배열을 생성하고 각 엘리먼트를 null로 설정합니다. 그 주위에 있는 useState() 호출은 처음에 해당 배열로 설정된 squares state 변수를 선언합니다. 배열의 각 항목은 사각형의 값에 해당합니다. 나중에 보드를 채우면, squares 배열은 다음과 같은 모양이 됩니다:
['O', null, 'X', 'X', 'X', 'O', 'O', null, null]Now your Board component needs to pass the value prop down to each Square that it renders:
이제 Board 컴포넌트는 렌더링하는 각 Square 컴포넌트에 value prop를 전달해야 합니다:
export default function Board() {
  const [squares, setSquares] = useState(Array(9).fill(null));
  return (
    <>
      <div className="board-row">
        <Square value={squares[0]} />
        <Square value={squares[1]} />
        <Square value={squares[2]} />
      </div>
      <div className="board-row">
        <Square value={squares[3]} />
        <Square value={squares[4]} />
        <Square value={squares[5]} />
      </div>
      <div className="board-row">
        <Square value={squares[6]} />
        <Square value={squares[7]} />
        <Square value={squares[8]} />
      </div>
    </>
  );
}
Next, you’ll edit the Square component to receive the value prop from the Board component. This will require removing the Square component’s own stateful tracking of value and the button’s onClick prop:
다음으로, 보드 컴포넌트에서 각 prop value를 받을 수 있도록 Square 컴포넌트를 편집합니다. 이를 위해 사각형 컴포넌트에서 value의 자체 state 추적과 버튼의 onClick prop를 제거해야 합니다:
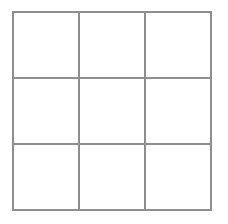
function Square({value}) {
  return <button className="square">{value}</button>;
}
At this point you should see an empty tic-tac-toe board: 이 시점에서 빈 틱택토 보드를 확인할 수 있습니다:
And your code should look like this: 또한 코드는 다음과 같아야 합니다:
import { useState } from 'react';

function Square({ value }) {
  return <button className="square">{value}</button>;
}

export default function Board() {
  const [squares, setSquares] = useState(Array(9).fill(null));
  return (
    <>
      <div className="board-row">
        <Square value={squares[0]} />
        <Square value={squares[1]} />
        <Square value={squares[2]} />
      </div>
      <div className="board-row">
        <Square value={squares[3]} />
        <Square value={squares[4]} />
        <Square value={squares[5]} />
      </div>
      <div className="board-row">
        <Square value={squares[6]} />
        <Square value={squares[7]} />
        <Square value={squares[8]} />
      </div>
    </>
  );
}
Each Square will now receive a value prop that will either be 'X', 'O', or null for empty squares.
이제 각 사각형은 'X', 'O', 또는 빈 사각형의 경우 null이 되는 value prop를 받습니다.
Next, you need to change what happens when a Square is clicked. The Board component now maintains which squares are filled. You’ll need to create a way for the Square to update the Board’s state. Since state is private to a component that defines it, you cannot update the Board’s state directly from Square.
다음으로 Square가 클릭되었을 때 발생하는 동작을 변경해야 합니다. 이제 Board 컴포넌트가 어떤 사각형이 채워졌는지 여부를 관리하므로 Square가 Board의 state를 업데이트할 수 있는 방법을 만들어야 합니다. 컴포넌트는 자신이 정의한 state에만 접근할 수 있으므로 Square에서 Board의 state를 직접 변경할 수 없습니다.
Instead, you’ll pass down a function from the Board component to the Square component, and you’ll have Square call that function when a square is clicked. You’ll start with the function that the Square component will call when it is clicked. You’ll call that function onSquareClick:
대신에, Board 컴포넌트에서 Square 컴포넌트로 함수를 전달하고, 사각형이 클릭될 때 Square가 해당 함수를 호출하도록 할 수 있습니다. Square 컴포넌트가 클릭될 때 호출할 함수부터 시작하겠습니다. onSquareClick으로 해당 함수를 호출하도록 하겠습니다:
function Square({ value }) {
  return (
    <button className="square" onClick={onSquareClick}>
      {value}
    </button>
  );
}
Next, you’ll add the onSquareClick function to the Square component’s props:
다음으로, Square 컴포넌트의 props에 onSquareClick 함수를 추가합니다:
function Square({ value, onSquareClick }) {
  return (
    <button className="square" onClick={onSquareClick}>
      {value}
    </button>
  );
}
Now you’ll connect the onSquareClick prop to a function in the Board component that you’ll name handleClick. To connect onSquareClick to handleClick you’ll pass a function to the onSquareClick prop of the first Square component:
이제, onSquareClick prop을 Board 컴포넌트의 handleClick 함수와 연결하세요. onSquareClick 함수를 handleClick과 연결하려면 첫 번째 Square 컴포넌트의 onSquareClick prop에 해당 함수를 전달하면 됩니다:
export default function Board() {
  const [squares, setSquares] = useState(Array(9).fill(null));

  return (
    <>
      <div className="board-row">
        <Square value={squares[0]} onSquareClick={handleClick} />
        //...
  );
}
Lastly, you will define the handleClick function inside the Board component to update the squares array holding your board’s state:
마지막으로, 보드 컴포넌트 내부에 handleClick 함수를 정의하여 보드의 state를 담고 있는 squares 배열을 업데이트하세요:
export default function Board() {
  const [squares, setSquares] = useState(Array(9).fill(null));

  function handleClick() {
    const nextSquares = squares.slice();
    nextSquares[0] = "X";
    setSquares(nextSquares);
  }

  return (
    // ...
  )
}
The handleClick function creates a copy of the squares array (nextSquares) with the JavaScript slice() Array method. Then, handleClick updates the nextSquares array to add X to the first ([0] index) square.
handleClick 함수는 JavaScript의 slice() 배열 메서드를 사용하여 squares 배열의 사본(nextSquares)을 생성합니다. 그런 다음 handleClick 함수는 nextSquares 배열의 첫 번째 사각형([0] 인덱스)에 X를 추가하여 업데이트합니다.
Calling the setSquares function lets React know the state of the component has changed. This will trigger a re-render of the components that use the squares state (Board) as well as its child components (the Square components that make up the board).
setSquares 함수를 호출하면 React는 컴포넌트의 state가 변경되었음을 알 수 있습니다. 그러면 squares 의 state를 사용하는 컴포넌트(Board)와 그 하위 컴포넌트(보드를 구성하는 Square 컴포넌트)가 다시 렌더링 됩니다.
Now you can add X’s to the board… but only to the upper left square. Your handleClick function is hardcoded to update the index for the upper left square (0). Let’s update handleClick to be able to update any square. Add an argument i to the handleClick function that takes the index of the square to update:
이제 우리는 보드에 X를 추가할 수 있지만… 왼쪽 상단 사각형에만 추가할 수 있습니다. 우리의 handleClick 함수는 왼쪽 상단 사각형(0)의 인덱스만 업데이트하도록 하드코딩되어 있습니다. 모든 사각형을 업데이트할 수 있도록 handleClick 함수를 수정하겠습니다. handleClick 함수에 업데이트할 사각형의 인덱스를 나타내는 인수 i를 추가하세요:
export default function Board() {
  const [squares, setSquares] = useState(Array(9).fill(null));

  function handleClick(i) {
    const nextSquares = squares.slice();
    nextSquares[i] = "X";
    setSquares(nextSquares);
  }

  return (
    // ...
  )
}
Next, you will need to pass that i to handleClick. You could try to set the onSquareClick prop of square to be handleClick(0) directly in the JSX like this, but it won’t work:
다음으로, 인수 i를 handleClick에 전달해야 합니다. 사각형의 onSquareClick prop를 아래와 같이 JSX에서 직접 handleClick(0)으로 설정할 수도 있지만, 작동하지 않습니다:
<Square value={squares[0]} onSquareClick={handleClick(0)} />Here is why this doesn’t work. The handleClick(0) call will be a part of rendering the board component. Because handleClick(0) alters the state of the board component by calling setSquares, your entire board component will be re-rendered again. But this runs handleClick(0) again, leading to an infinite loop:
handleClick(0) 호출은 보드 컴포넌트 렌더링의 일부가 될 것입니다. handleClick(0)은 setSquares를 호출하여 보드 컴포넌트의 state를 변경하기 때문에, 보드 컴포넌트 전체가 다시 렌더링됩니다. 하지만 handleClick(0)은 이제 보드 컴포넌트 렌더링의 일부이므로, 무한 루프에 빠지게 됩니다:
Why didn’t this problem happen earlier? 왜 이러한 문제가 더 일찍 발생하지 않았을까요?
When you were passing onSquareClick={handleClick}, you were passing the handleClick function down as a prop. You were not calling it! But now you are calling that function right away—notice the parentheses in handleClick(0)—and that’s why it runs too early. You don’t want to call handleClick until the user clicks!
우리는 onSquareClick={handleClick}을 전달할 때, handleClick 함수를 prop로 전달했습니다. 함수를 호출한 것이 아니었어요! 하지만 지금은 handleClick(0)의 괄호를 보면 알 수 있듯이 해당 함수를 호출하고 있기 때문에 해당 함수가 너무 일찍 실행됩니다. 우리는 사용자가 클릭하기 전까지 handleClick 함수를 호출하고 싶지 않아요!
You could fix this by creating a function like handleFirstSquareClick that calls handleClick(0), a function like handleSecondSquareClick that calls handleClick(1), and so on. You would pass (rather than call) these functions down as props like onSquareClick={handleFirstSquareClick}. This would solve the infinite loop.
이 문제를 해결하려면, handleClick(0)을 호출하는 handleFirstSquareClick 함수를 만들고, handleClick(1) 을 호출하는 handleSecondSquareClick 을 만들고… 계속해서 만들면 됩니다. 그리고 아까와 같이 호출하는 대신 onSquareClick={handleFirstSquareClick} 와 같은 함수를 prop로 전달 해 주면 됩니다. 이렇게 하면 무한 루프를 해결 할 수 있습니다.
However, defining nine different functions and giving each of them a name is too verbose. Instead, let’s do this: 하지만, 9개의 서로 다른 함수를 정의하고 각각에 이름을 붙이는 것은 너무 장황합니다. 대신 이렇게 해보겠습니다:
export default function Board() {
  // ...
  return (
    <>
      <div className="board-row">
        <Square value={squares[0]} onSquareClick={() => handleClick(0)} />
        // ...
  );
}
Notice the new () => syntax. Here, () => handleClick(0) is an arrow function, which is a shorter way to define functions. When the square is clicked, the code after the => “arrow” will run, calling handleClick(0).
새로운 문법 () =>에 주목하세요. 여기서, () => handleClick(0)은 화살표 함수로, 함수를 짧게 정의할 수 있는 방법입니다. 사각형이 클릭되면, => “화살표” 뒤의 코드가 실행되어 handleClick(0)을 호출합니다.
Now you need to update the other eight squares to call handleClick from the arrow functions you pass. Make sure that the argument for each call of the handleClick corresponds to the index of the correct square:
이제 전달한 화살표 함수에서 handleClick을 호출하도록 나머지 8개의 사각형 컴포넌트를 수정해야 합니다. handleClick을 호출할 때마다 인수가 올바른 사각형의 인덱스에 해당하는지 확인하세요:
export default function Board() {
  // ...
  return (
    <>
      <div className="board-row">
        <Square value={squares[0]} onSquareClick={() => handleClick(0)} />
        <Square value={squares[1]} onSquareClick={() => handleClick(1)} />
        <Square value={squares[2]} onSquareClick={() => handleClick(2)} />
      </div>
      <div className="board-row">
        <Square value={squares[3]} onSquareClick={() => handleClick(3)} />
        <Square value={squares[4]} onSquareClick={() => handleClick(4)} />
        <Square value={squares[5]} onSquareClick={() => handleClick(5)} />
      </div>
      <div className="board-row">
        <Square value={squares[6]} onSquareClick={() => handleClick(6)} />
        <Square value={squares[7]} onSquareClick={() => handleClick(7)} />
        <Square value={squares[8]} onSquareClick={() => handleClick(8)} />
      </div>
    </>
  );
};
Now you can again add X’s to any square on the board by clicking on them: 이제 보드의 아무 사각형을 클릭하여 X를 다시 추가할 수 있습니다:
But this time all the state management is handled by the Board component!
하지만 이번에는 모든 state 관리가 사각형이 아닌 Board 컴포넌트에서 처리됩니다!
This is what your code should look like: 이제 우리의 코드는 다음과 같습니다:
import { useState } from 'react';

function Square({ value, onSquareClick }) {
  return (
    <button className="square" onClick={onSquareClick}>
      {value}
    </button>
  );
}

export default function Board() {
  const [squares, setSquares] = useState(Array(9).fill(null));

  function handleClick(i) {
    const nextSquares = squares.slice();
    nextSquares[i] = 'X';
    setSquares(nextSquares);
  }

  return (
    <>
      <div className="board-row">
        <Square value={squares[0]} onSquareClick={() => handleClick(0)} />
        <Square value={squares[1]} onSquareClick={() => handleClick(1)} />
        <Square value={squares[2]} onSquareClick={() => handleClick(2)} />
      </div>
      <div className="board-row">
        <Square value={squares[3]} onSquareClick={() => handleClick(3)} />
        <Square value={squares[4]} onSquareClick={() => handleClick(4)} />
        <Square value={squares[5]} onSquareClick={() => handleClick(5)} />
      </div>
      <div className="board-row">
        <Square value={squares[6]} onSquareClick={() => handleClick(6)} />
        <Square value={squares[7]} onSquareClick={() => handleClick(7)} />
        <Square value={squares[8]} onSquareClick={() => handleClick(8)} />
      </div>
    </>
  );
}
Now that your state handling is in the Board component, the parent Board component passes props to the child Square components so that they can be displayed correctly. When clicking on a Square, the child Square component now asks the parent Board component to update the state of the board. When the Board’s state changes, both the Board component and every child Square re-renders automatically. Keeping the state of all squares in the Board component will allow it to determine the winner in the future.
이제 모든 state 관리는 Board에 있으므로, 부모 Board 컴포넌트는 자식 Square 컴포넌트가 올바르게 표시될 수 있도록 props를 전달합니다. Square를 클릭하면 자식 Square 컴포넌트가 부모 Board 컴포넌트에 보드의 state를 업데이트하도록 요청합니다. Board의 state가 변경되면, Board 컴포넌트와 모든 자식 Square 컴포넌트가 자동으로 다시 렌더링됩니다. Board 컴포넌트에 속한 모든 사각형의 state를 유지하면 나중에 승자를 결정할 수 있습니다..
Let’s recap what happens when a user clicks the top left square on your board to add an X to it:
사용자가 보드의 왼쪽 상단 사각형을 클릭하여 X를 추가하면 어떤 일이 발생하는지 다시 한 번 정리해 보겠습니다:
- Clicking on the upper left square runs the function that the
buttonreceived as itsonClickprop from theSquare. TheSquarecomponent received that function as itsonSquareClickprop from theBoard. TheBoardcomponent defined that function directly in the JSX. It callshandleClickwith an argument of0. handleClickuses the argument (0) to update the first element of thesquaresarray fromnulltoX.- The
squaresstate of theBoardcomponent was updated, so theBoardand all of its children re-render. This causes thevalueprop of theSquarecomponent with index0to change fromnulltoX.
- 왼쪽 상단 사각형을 클릭하면
button이Square로부터onClickprop로 받은 함수가 실행됩니다. handleClick은 인수(0)을 사용하여squares배열의 첫 번째 요소를null에서X로 업데이트합니다.Board컴포넌트의squaresstate가 업데이트되어,Board와 그 모든 자식이 다시 렌더링됩니다. 이로 인해 인덱스가0인Square컴포넌트의valueprop가null에서X로 변경됩니다.
In the end the user sees that the upper left square has changed from empty to having a X after clicking it.
결국 사용자는 왼쪽 상단 사각형을 클릭한 후 비어있는 사각형이 X가 표시된 상태로 변경된 것을 확인할 수 있습니다.
Why immutability is important불변성이 왜 중요할까요?
Note how in handleClick, you call .slice() to create a copy of the squares array instead of modifying the existing array. To explain why, we need to discuss immutability and why immutability is important to learn.
handleClick에서, 기존 배열을 수정하는 대신 .slice()를 호출하여 squares 배열의 사본을 생성하는 방법에 주목하세요. 그 이유를 설명하기 위해 불변성과 불변성을 배우는 것이 중요한 이유에 대해 논의해 보겠습니다.
There are generally two approaches to changing data. The first approach is to mutate the data by directly changing the data’s values. The second approach is to replace the data with a new copy which has the desired changes. Here is what it would look like if you mutated the squares array:
일반적으로 데이터를 변경하는 방법에는 두 가지가 있습니다. 첫 번째 방법은 데이터의 값을 직접 변경하여 데이터를 수정하는 것입니다. 두 번째 방법은 원하는 변경 사항이 있는 새 복사본으로 데이터를 대체하는 것입니다. 다음은 squares 배열을 변경한 경우의 모습입니다:
const squares = [null, null, null, null, null, null, null, null, null];
squares[0] = 'X';
// Now `squares` is ["X", null, null, null, null, null, null, null, null];
And here is what it would look like if you changed data without mutating the squares array:
다음은 squares 배열을 변경하지 않고 데이터를 변경한 경우의 모습입니다:
const squares = [null, null, null, null, null, null, null, null, null];
const nextSquares = ['X', null, null, null, null, null, null, null, null];
// Now `squares` is unchanged, but `nextSquares` first element is 'X' rather than `null`
The result is the same but by not mutating (changing the underlying data) directly, you gain several benefits. 최종 결과는 동일하지만, 원본 데이터를 직접 변경하지 않음으로써 몇 가지 이점을 얻을 수 있습니다.
Immutability makes complex features much easier to implement. Later in this tutorial, you will implement a “time travel” feature that lets you review the game’s history and “jump back” to past moves. This functionality isn’t specific to games—an ability to undo and redo certain actions is a common requirement for apps. Avoiding direct data mutation lets you keep previous versions of the data intact, and reuse them later. 불변성을 사용하면 복잡한 기능을 훨씬 쉽게 구현할 수 있습니다. 우리는 이 자습서의 뒷부분에서 게임의 history를 검토하고 과거 동작으로 “돌아가기”할 수 있는 “시간 여행” 기능을 구현할 예정입니다. 특정 작업을 실행 취소하고 다시 실행하는 기능은 이 게임에만 국한된 것이 아닌 앱의 일반적인 요구사항 입니다. 직접적인 데이터 변경을 피하면 이전 버전의 데이터를 그대로 유지하여 나중에 재사용(또는 초기화) 할 수 있습니다.
There is also another benefit of immutability. By default, all child components re-render automatically when the state of a parent component changes. This includes even the child components that weren’t affected by the change. Although re-rendering is not by itself noticeable to the user (you shouldn’t actively try to avoid it!), you might want to skip re-rendering a part of the tree that clearly wasn’t affected by it for performance reasons. Immutability makes it very cheap for components to compare whether their data has changed or not. You can learn more about how React chooses when to re-render a component in the memo API reference.
불변성을 사용하는 것의 또 다른 장점이 있습니다. 기본적으로 부모 컴포넌트의 state가 변경되면 모든 자식 컴포넌트가 자동으로 다시 렌더링됩니다. 여기에는 변경사항이 없는 자식 컴포넌트도 포함됩니다. 리렌더링 자체가 사용자에게 보여지는 것은 아니지만(적극적으로 피하려고 하는 것은 좋지 않습니다!), 우리는 성능상의 이유로 트리의 영향을 받지 않는 부분의 리렌더링을 피하고 싶습니다. 불변성을 사용하면 컴포넌트가 데이터의 변경 여부를 저렴한 비용으로 판단할 수 있습니다. 자세한 내용은 the memo API reference 문서에서 React가 컴포넌트 다시 렌더링하는 시점을 선택하는 방법에 대해 살펴볼 수 있습니다.
Taking turns순서 정하기
It’s now time to fix a major defect in this tic-tac-toe game: the “O”s cannot be marked on the board. 이제 이 틱택토 게임에서 “O”를 보드에 표시할 수 없다는 가장 큰 결함을 수정할 차례입니다.
You’ll set the first move to be “X” by default. Let’s keep track of this by adding another piece of state to the Board component: 기본적으로 첫 번째 이동을 “X”로 설정합니다. 이제 보드 컴포넌트에 또 다른 state를 추가하여 추적해 보겠습니다:
function Board() {
  const [xIsNext, setXIsNext] = useState(true);
  const [squares, setSquares] = useState(Array(9).fill(null));

  // ...
}
Each time a player moves, xIsNext (a boolean) will be flipped to determine which player goes next and the game’s state will be saved. You’ll update the Board’s handleClick function to flip the value of xIsNext:
플레이어가 움직일 때마다, 다음 플레이어를 결정하기 위해 xIsNext (불리언)의 값이 반전되고 게임의 state가 저장됩니다. Board 의 handleClick 함수를 업데이트하여 xIsNext 의 값을 반전시키세요:
export default function Board() {
  const [xIsNext, setXIsNext] = useState(true);
  const [squares, setSquares] = useState(Array(9).fill(null));

  function handleClick(i) {
    const nextSquares = squares.slice();
    if (xIsNext) {
      nextSquares[i] = "X";
    } else {
      nextSquares[i] = "O";
    }
    setSquares(nextSquares);
    setXIsNext(!xIsNext);
  }

  return (
    //...
  );
}
Now, as you click on different squares, they will alternate between X and O, as they should!
이제, 다른 사각형을 클릭하면, 정상적으로 ‘X’와 ‘O’가 번갈아 표시됩니다!
But wait, there’s a problem. Try clicking on the same square multiple times: 하지만 다른 문제가 발생했습니다. 같은 사각형을 여러 번 클릭해 보세요:
The X is overwritten by an O! While this would add a very interesting twist to the game, we’re going to stick to the original rules for now.
X가 O로 덮어씌워집니다! 이렇게 하면 게임의 규칙에 매우 흥미로운 꼬임을 더할 수 있지만, 지금은 원래의 규칙을 유지하겠습니다.
When you mark a square with a X or an O you aren’t first checking to see if the square already has a X or O value. You can fix this by returning early. You’ll check to see if the square already has a X or an O. If the square is already filled, you will return in the handleClick function early—before it tries to update the board state.
우리는 X 와 O로 사각형을 표시할때 먼저 해당 사각형에 이미 X 또는 O 값이 있는지 확인하고 있지 않습니다. 우리는 일찍이 돌아와서 이 문제를 해결할 수 있습니다. 우리는 사각형이 이미 X 와 O 가 있는 지 확인 할 것입니다. 사각형이 이미 채워져 있는 경우, 보드의 state를 업데이트 하기 전에 handleClick 함수에서 일찍 return 할 것입니다.
function handleClick(i) {
  if (squares[i]) {
    return;
  }
  const nextSquares = squares.slice();
  //...
}
Now you can only add X’s or O’s to empty squares! Here is what your code should look like at this point:
이제 빈 사각형에 X 또는 O 만 추가할 수 있습니다! 이 시점에서 코드는 다음과 같습니다:
import { useState } from 'react';

function Square({value, onSquareClick}) {
  return (
    <button className="square" onClick={onSquareClick}>
      {value}
    </button>
  );
}

export default function Board() {
  const [xIsNext, setXIsNext] = useState(true);
  const [squares, setSquares] = useState(Array(9).fill(null));

  function handleClick(i) {
    if (squares[i]) {
      return;
    }
    const nextSquares = squares.slice();
    if (xIsNext) {
      nextSquares[i] = 'X';
    } else {
      nextSquares[i] = 'O';
    }
    setSquares(nextSquares);
    setXIsNext(!xIsNext);
  }

  return (
    <>
      <div className="board-row">
        <Square value={squares[0]} onSquareClick={() => handleClick(0)} />
        <Square value={squares[1]} onSquareClick={() => handleClick(1)} />
        <Square value={squares[2]} onSquareClick={() => handleClick(2)} />
      </div>
      <div className="board-row">
        <Square value={squares[3]} onSquareClick={() => handleClick(3)} />
        <Square value={squares[4]} onSquareClick={() => handleClick(4)} />
        <Square value={squares[5]} onSquareClick={() => handleClick(5)} />
      </div>
      <div className="board-row">
        <Square value={squares[6]} onSquareClick={() => handleClick(6)} />
        <Square value={squares[7]} onSquareClick={() => handleClick(7)} />
        <Square value={squares[8]} onSquareClick={() => handleClick(8)} />
      </div>
    </>
  );
}
Declaring a winner승자 결정하기
Now that the players can take turns, you’ll want to show when the game is won and there are no more turns to make. To do this you’ll add a helper function called calculateWinner that takes an array of 9 squares, checks for a winner and returns 'X', 'O', or null as appropriate. Don’t worry too much about the calculateWinner function; it’s not specific to React:
이제 어느 플레이어의 다음 차례인지 표시했으니, 게임의 승자가 결정되어 더이상 차례를 만들 필요가 없을 때도 표시해야 합니다. 이를 위해 9개의 사각형 배열을 가져와서 승자를 확인하고 적절하게 'X', 'O', 또는 null을 반환하는 헬퍼 함수 calculateWinner를 추가 할 것입니다. calculateWinner 함수에 대해 너무 걱정하지 마세요. 이 함수는 React에만 국한되지 않으니까요:
export default function Board() {
  //...
}

function calculateWinner(squares) {
  const lines = [
    [0, 1, 2],
    [3, 4, 5],
    [6, 7, 8],
    [0, 3, 6],
    [1, 4, 7],
    [2, 5, 8],
    [0, 4, 8],
    [2, 4, 6]
  ];
  for (let i = 0; i < lines.length; i++) {
    const [a, b, c] = lines[i];
    if (squares[a] && squares[a] === squares[b] && squares[a] === squares[c]) {
      return squares[a];
    }
  }
  return null;
}You will call calculateWinner(squares) in the Board component’s handleClick function to check if a player has won. You can perform this check at the same time you check if a user has clicked a square that already has a X or and O. We’d like to return early in both cases:
Board 컴포넌트의 handleClick 함수에서 calculateWinner(squares)를 호출하여 플레이어가 이겼는지 확인합니다. 이 검사는 사용자가 이미 X 또는 O가 있는 사각형을 클릭했는지를 확인하는 것과 동시에 수행할 수 있습니다. 두 경우 모두 조기에 반환하고 싶습니다:
function handleClick(i) {
  if (squares[i] || calculateWinner(squares)) {
    return;
  }
  const nextSquares = squares.slice();
  //...
}
To let the players know when the game is over, you can display text such as “Winner: X” or “Winner: O”. To do that you’ll add a status section to the Board component. The status will display the winner if the game is over and if the game is ongoing you’ll display which player’s turn is next:
게임이 끝났을 때 플레이어에게 알리기 위해 “Winner: X” 또는 “Winner: O”라고 표기할 수 있습니다. 이렇게 하려면 Board 컴포넌트에 status 섹션을 추가하면 됩니다. 게임이 끝난 경우 status는 승자를 표시하고 게임이 진행 중인 경우 다음 플레이어의 차례를 표시합니다:
export default function Board() {
  // ...
  const winner = calculateWinner(squares);
  let status;
  if (winner) {
    status = "Winner: " + winner;
  } else {
    status = "Next player: " + (xIsNext ? "X" : "O");
  }

  return (
    <>
      <div className="status">{status}</div>
      <div className="board-row">
        // ...
  )
}
Congratulations! You now have a working tic-tac-toe game. And you’ve just learned the basics of React too. So you are the real winner here. Here is what the code should look like: 축하합니다! 이제 제대로 작동하는 틱택토 게임을 만들었습니다. 그리고 방금 React의 기본도 배웠습니다. 그러니 여기서 진정한 승자는 바로 여러분입니다. 코드는 다음과 같습니다:
import { useState } from 'react';

function Square({value, onSquareClick}) {
  return (
    <button className="square" onClick={onSquareClick}>
      {value}
    </button>
  );
}

export default function Board() {
  const [xIsNext, setXIsNext] = useState(true);
  const [squares, setSquares] = useState(Array(9).fill(null));

  function handleClick(i) {
    if (calculateWinner(squares) || squares[i]) {
      return;
    }
    const nextSquares = squares.slice();
    if (xIsNext) {
      nextSquares[i] = 'X';
    } else {
      nextSquares[i] = 'O';
    }
    setSquares(nextSquares);
    setXIsNext(!xIsNext);
  }

  const winner = calculateWinner(squares);
  let status;
  if (winner) {
    status = 'Winner: ' + winner;
  } else {
    status = 'Next player: ' + (xIsNext ? 'X' : 'O');
  }

  return (
    <>
      <div className="status">{status}</div>
      <div className="board-row">
        <Square value={squares[0]} onSquareClick={() => handleClick(0)} />
        <Square value={squares[1]} onSquareClick={() => handleClick(1)} />
        <Square value={squares[2]} onSquareClick={() => handleClick(2)} />
      </div>
      <div className="board-row">
        <Square value={squares[3]} onSquareClick={() => handleClick(3)} />
        <Square value={squares[4]} onSquareClick={() => handleClick(4)} />
        <Square value={squares[5]} onSquareClick={() => handleClick(5)} />
      </div>
      <div className="board-row">
        <Square value={squares[6]} onSquareClick={() => handleClick(6)} />
        <Square value={squares[7]} onSquareClick={() => handleClick(7)} />
        <Square value={squares[8]} onSquareClick={() => handleClick(8)} />
      </div>
    </>
  );
}

function calculateWinner(squares) {
  const lines = [
    [0, 1, 2],
    [3, 4, 5],
    [6, 7, 8],
    [0, 3, 6],
    [1, 4, 7],
    [2, 5, 8],
    [0, 4, 8],
    [2, 4, 6],
  ];
  for (let i = 0; i < lines.length; i++) {
    const [a, b, c] = lines[i];
    if (squares[a] && squares[a] === squares[b] && squares[a] === squares[c]) {
      return squares[a];
    }
  }
  return null;
}
Adding time travel시간여행 추가하기
As a final exercise, let’s make it possible to “go back in time” to the previous moves in the game. 마지막 연습으로, 게임의 이전 동작으로 ‘시간을 거슬러 올라가는’ 기능을 만들어 보겠습니다.
Storing a history of moves이동 history 저장하기
If you mutated the squares array, implementing time travel would be very difficult.
squares 배열을 변경하면 시간 여행을 구현하는 것이 매우 어려울 것입니다.
However, you used slice() to create a new copy of the squares array after every move, and treated it as immutable. This will allow you to store every past version of the squares array, and navigate between the turns that have already happened.
그러나 우리는 slice()를 사용하여 매번 이동할 때마다 squares 배열의 새 복사본을 생성하고 이를 불변으로 처리했습니다. 덕분에 squares 배열의 모든 과거 버전을 저장할 수 있고, 이미 발생한 턴 사이를 탐색할 수 있습니다.
You’ll store the past squares arrays in another array called history, which you’ll store as a new state variable. The history array represents all board states, from the first to the last move, and has a shape like this:
과거의 squares 배열을 history라는 다른 배열에 저장하고, 이 배열을 새로운 state 변수로 저장할 것입니다. history 배열은 첫 번째 이동부터 마지막 이동까지 모든 보드 state를 나타내며 다음과 같은 모양을 갖습니다:
[
  // Before first move
  [null, null, null, null, null, null, null, null, null],
  // After first move
  [null, null, null, null, 'X', null, null, null, null],
  // After second move
  [null, null, null, null, 'X', null, null, null, 'O'],
  // ...
]
Lifting state up, again다시, state 끌어올리기
You will now write a new top-level component called Game to display a list of past moves. That’s where you will place the history state that contains the entire game history.
이제 과거 이동 목록을 표시하기 위해 Game이라는 새로운 최상위 컴포넌트를 작성합니다. 여기에 전체 게임 history를 포함하는 history state를 배치할 것입니다.
Placing the history state into the Game component will let you remove the squares state from its child Board component. Just like you “lifted state up” from the Square component into the Board component, you will now lift it up from the Board into the top-level Game component. This gives the Game component full control over the Board’s data and lets it instruct the Board to render previous turns from the history.
history state를 Game 컴포넌트에 배치하면 자식 Board 컴포넌트에서 squares state를 제거할 수 있습니다. Square 컴포넌트에서 Board 컴포넌트로 state를 “끌어올린” 것처럼, 이제 Board에서 최상위 Game 컴포넌트로 state를 끌어올릴 수 있습니다. 이렇게 하면 Game 컴포넌트가 Board의 데이터를 완전히 제어하고 Board에 history에서 이전 턴을 렌더링하도록 지시할 수 있습니다.
First, add a Game component with export default. Have it render the Board component and some markup:
먼저, export default가 있는 Game 컴포넌트를 추가합니다. 일부 마크업 안에 Board 컴포넌트를 렌더링하도록 합니다:
function Board() {
  // ...
}

export default function Game() {
  return (
    <div className="game">
      <div className="game-board">
        <Board />
      </div>
      <div className="game-info">
        <ol>{/*TODO*/}</ol>
      </div>
    </div>
  );
}
Note that you are removing the export default keywords before the function Board() { declaration and adding them before the function Game() { declaration. This tells your index.js file to use the Game component as the top-level component instead of your Board component. The additional divs returned by the Game component are making room for the game information you’ll add to the board later.
function Board() { 선언 앞에 export default 키워드를 제거하고 function Game() { 선언 앞에 추가하는 것에 유의하세요. 이렇게 하면 index.js 파일에서 Board 컴포넌트 대신 Game 컴포넌트를 최상위 컴포넌트로 사용하도록 지시합니다. Game 컴포넌트가 반환하는 내용에 추가한 div는 나중에 보드에 추가할 게임 정보를 위한 공간을 확보합니다.
Add some state to the Game component to track which player is next and the history of moves:
다음 플레이어와 이동 history를 추적하기 위해 Game 컴포넌트에 몇몇 state를 추가합니다:
export default function Game() {
  const [xIsNext, setXIsNext] = useState(true);
  const [history, setHistory] = useState([Array(9).fill(null)]);
  // ...
Notice how [Array(9).fill(null)] is an array with a single item, which itself is an array of 9 nulls.
다음 플레이어와 이동 history를 추적하기 위해 Game 컴포넌트에 몇몇 state를 추가합니다:
To render the squares for the current move, you’ll want to read the last squares array from the history. You don’t need useState for this—you already have enough information to calculate it during rendering:
현재 이동에 대한 squares를 렌더링하려면 ,history에서 마지막 squares 배열을 읽어야 합니다. 렌더링 중에 계산할 수 있는 충분한 정보가 이미 있으므로 useState는 필요하지 않습니다:
export default function Game() {
  const [xIsNext, setXIsNext] = useState(true);
  const [history, setHistory] = useState([Array(9).fill(null)]);
  const currentSquares = history[history.length - 1];
  // ...
Next, create a handlePlay function inside the Game component that will be called by the Board component to update the game. Pass xIsNext, currentSquares and handlePlay as props to the Board component:
다음으로, Game 컴포넌트 안에 Board 컴포넌트가 게임을 업데이트할 때 호출할 handlePlay 함수를 생성합니다. xIsNext, currentSquares, handlePlay를 Board 컴포넌트에 props로 전달합니다:
export default function Game() {
  const [xIsNext, setXIsNext] = useState(true);
  const [history, setHistory] = useState([Array(9).fill(null)]);
  const currentSquares = history[history.length - 1];

  function handlePlay(nextSquares) {
    // TODO
  }

  return (
    <div className="game">
      <div className="game-board">
        <Board xIsNext={xIsNext} squares={currentSquares} onPlay={handlePlay} />
        //...
  )
}
Let’s make the Board component fully controlled by the props it receives. Change the Board component to take three props: xIsNext, squares, and a new onPlay function that Board can call with the updated squares array when a player makes a move. Next, remove the first two lines of the Board function that call useState:
Board 컴포넌트가 props에 의해 완전히 제어되도록 만들어 봅시다. Board 컴포넌트를 변경해 세 개의 props, 즉,xIsNext, squares, 그리고 플레이어가 움직일 때마다 업데이트된 squares 배열로 Board가 호출할 수 있는 새로운 onPlay 함수가 추가되도록 합니다. 다음으로, Board 함수에서 useState를 호출하는 처음 두 줄을 제거합니다:
function Board({ xIsNext, squares, onPlay }) {
  function handleClick(i) {
    //...
  }
  // ...
}
Now replace the setSquares and setXIsNext calls in handleClick in the Board component with a single call to your new onPlay function so the Game component can update the Board when the user clicks a square:
이제 Board 컴포넌트의 handleClick에 있는 setSquares 및 setXIsNext 호출을 새로운 onPlay 함수에 대한 단일 호출로 대체함으로써, 사용자가 square를 클릭할 때 Game 컴포넌트가 Board를 업데이트할 수 있습니다:
function Board({ xIsNext, squares, onPlay }) {
  function handleClick(i) {
    if (calculateWinner(squares) || squares[i]) {
      return;
    }
    const nextSquares = squares.slice();
    if (xIsNext) {
      nextSquares[i] = "X";
    } else {
      nextSquares[i] = "O";
    }
    onPlay(nextSquares);
  }
  //...
}
The Board component is fully controlled by the props passed to it by the Game component. You need to implement the handlePlay function in the Game component to get the game working again.
Board 컴포넌트는 Game 컴포넌트가 전달한 props에 의해 완전히 제어됩니다. 게임을 다시 작동시키려면 Game 컴포넌트에서 handlePlay 함수를 구현해야 합니다.
What should handlePlay do when called? Remember that Board used to call setSquares with an updated array; now it passes the updated squares array to onPlay.
handlePlay가 호출되면 무엇을 해야 할까요? Board는 업데이트된 배열을 가지고 setSquares를 호출했지만, 이제는 업데이트된 squares 배열을 onPlay로 전달한다는걸 기억하세요.
The handlePlay function needs to update Game’s state to trigger a re-render, but you don’t have a setSquares function that you can call any more—you’re now using the history state variable to store this information. You’ll want to update history by appending the updated squares array as a new history entry. You also want to toggle xIsNext, just as Board used to do:
handlePlay 함수는 re-render를 촉발시키기 위해 Game의 state를 업데이트해야 하지만, 더 이상 호출할 수 있는 setSquares 함수가 없으며 대신 이 정보를 저장하기 위해 history state 변수를 사용하고 있습니다. 업데이트된 squares 배열을 새 히스토리 항목으로 추가하여 history를 업데이트하고 싶을 것입니다. 또한 Board에서 했던 것처럼 xIsNext를 토글하고 싶을 것입니다:
export default function Game() {
  //...
  function handlePlay(nextSquares) {
    setHistory([...history, nextSquares]);
    setXIsNext(!xIsNext);
  }
  //...
}
Here, [...history, nextSquares] creates a new array that contains all the items in history, followed by nextSquares. (You can read the ...history spread syntax as “enumerate all the items in history”.)
여기서 [...history, nextSquares]는 history에 있는 모든 항목을 포함하는 새 배열을 만들고 그 뒤에 nextSquares를 만듭니다. (...history 전개 구문을 “history의 모든 항목 열거”로 읽을 수 있습니다.)
For example, if history is [[null,null,null], ["X",null,null]] and nextSquares is ["X",null,"O"], then the new [...history, nextSquares] array will be [[null,null,null], ["X",null,null], ["X",null,"O"]].
예를 들어, history가 [[null,null,null], ["X",null,null]]이고 nextSquares가 ["X",null,"O"]라면 새로운 [...history, nextSquares] 배열은 [[null,null,null], ["X",null,null], ["X",null,"O"]]가 될 것입니다.
At this point, you’ve moved the state to live in the Game component, and the UI should be fully working, just as it was before the refactor. Here is what the code should look like at this point:
이 시점에서 state를 Game 컴포넌트로 옮겼으므로 리팩터링 전과 마찬가지로 UI가 완전히 작동해야 합니다. 이 시점에서 코드의 모습은 다음과 같습니다:
import { useState } from 'react';

function Square({ value, onSquareClick }) {
  return (
    <button className="square" onClick={onSquareClick}>
      {value}
    </button>
  );
}

function Board({ xIsNext, squares, onPlay }) {
  function handleClick(i) {
    if (calculateWinner(squares) || squares[i]) {
      return;
    }
    const nextSquares = squares.slice();
    if (xIsNext) {
      nextSquares[i] = 'X';
    } else {
      nextSquares[i] = 'O';
    }
    onPlay(nextSquares);
  }

  const winner = calculateWinner(squares);
  let status;
  if (winner) {
    status = 'Winner: ' + winner;
  } else {
    status = 'Next player: ' + (xIsNext ? 'X' : 'O');
  }

  return (
    <>
      <div className="status">{status}</div>
      <div className="board-row">
        <Square value={squares[0]} onSquareClick={() => handleClick(0)} />
        <Square value={squares[1]} onSquareClick={() => handleClick(1)} />
        <Square value={squares[2]} onSquareClick={() => handleClick(2)} />
      </div>
      <div className="board-row">
        <Square value={squares[3]} onSquareClick={() => handleClick(3)} />
        <Square value={squares[4]} onSquareClick={() => handleClick(4)} />
        <Square value={squares[5]} onSquareClick={() => handleClick(5)} />
      </div>
      <div className="board-row">
        <Square value={squares[6]} onSquareClick={() => handleClick(6)} />
        <Square value={squares[7]} onSquareClick={() => handleClick(7)} />
        <Square value={squares[8]} onSquareClick={() => handleClick(8)} />
      </div>
    </>
  );
}

export default function Game() {
  const [xIsNext, setXIsNext] = useState(true);
  const [history, setHistory] = useState([Array(9).fill(null)]);
  const currentSquares = history[history.length - 1];

  function handlePlay(nextSquares) {
    setHistory([...history, nextSquares]);
    setXIsNext(!xIsNext);
  }

  return (
    <div className="game">
      <div className="game-board">
        <Board xIsNext={xIsNext} squares={currentSquares} onPlay={handlePlay} />
      </div>
      <div className="game-info">
        <ol>{/*TODO*/}</ol>
      </div>
    </div>
  );
}

function calculateWinner(squares) {
  const lines = [
    [0, 1, 2],
    [3, 4, 5],
    [6, 7, 8],
    [0, 3, 6],
    [1, 4, 7],
    [2, 5, 8],
    [0, 4, 8],
    [2, 4, 6],
  ];
  for (let i = 0; i < lines.length; i++) {
    const [a, b, c] = lines[i];
    if (squares[a] && squares[a] === squares[b] && squares[a] === squares[c]) {
      return squares[a];
    }
  }
  return null;
}
Showing the past moves과거 움직임 표시하기
Since you are recording the tic-tac-toe game’s history, you can now display a list of past moves to the player. 이제 틱택토 게임의 history를 기록하므로, 플레이어에게 과거 이동 목록을 표시할 수 있습니다.
React elements like <button> are regular JavaScript objects; you can pass them around in your application. To render multiple items in React, you can use an array of React elements.
<button>과 같은 React 엘리먼트는 일반 JavaScript 객체이므로 애플리케이션에서 전달할 수 있습니다. React에서 여러 엘리먼트를 렌더링하려면 React 엘리먼트 배열을 사용할 수 있습니다.
You already have an array of history moves in state, so now you need to transform it to an array of React elements. In JavaScript, to transform one array into another, you can use the array map method:
이미 state에 이동 history 배열이 있으므로, 이를 React 엘리먼트 배열로 변환해야 합니다. JavaScript에서 한 배열을 다른 배열로 변환하려면 array map 메서드를 사용하면 됩니다:
[1, 2, 3].map((x) => x * 2) // [2, 4, 6]You’ll use map to transform your history of moves into React elements representing buttons on the screen, and display a list of buttons to “jump” to past moves. Let’s map over the history in the Game component:
map을 사용해 이동 history를 화면의 버튼을 나타내는 React 엘리먼트로 변환하고, 과거의 이동으로 “점프”할 수 있는 버튼 목록을 표시합니다. Game 컴포넌트에서 history를 map해 봅시다:
export default function Game() {
  const [xIsNext, setXIsNext] = useState(true);
  const [history, setHistory] = useState([Array(9).fill(null)]);
  const currentSquares = history[history.length - 1];

  function handlePlay(nextSquares) {
    setHistory([...history, nextSquares]);
    setXIsNext(!xIsNext);
  }

  function jumpTo(nextMove) {
    // TODO
  }

  const moves = history.map((squares, move) => {
    let description;
    if (move > 0) {
      description = 'Go to move #' + move;
    } else {
      description = 'Go to game start';
    }
    return (
      <li>
        <button onClick={() => jumpTo(move)}>{description}</button>
      </li>
    );
  });

  return (
    <div className="game">
      <div className="game-board">
        <Board xIsNext={xIsNext} squares={currentSquares} onPlay={handlePlay} />
      </div>
      <div className="game-info">
        <ol>{moves}</ol>
      </div>
    </div>
  );
}
You can see what your code should look like below. Note that you should see an error in the developer tools console that says: 아래에서 코드가 어떻게 표시되는지 확인할 수 있습니다. 개발자 도구 콘솔에서 다음과 같은 오류가 표시되어야 합니다:
Game의 렌더링 메서드를 확인하세요.`You’ll fix this error in the next section. 다음 섹션에서 이 오류를 수정하겠습니다.
import { useState } from 'react';

function Square({ value, onSquareClick }) {
  return (
    <button className="square" onClick={onSquareClick}>
      {value}
    </button>
  );
}

function Board({ xIsNext, squares, onPlay }) {
  function handleClick(i) {
    if (calculateWinner(squares) || squares[i]) {
      return;
    }
    const nextSquares = squares.slice();
    if (xIsNext) {
      nextSquares[i] = 'X';
    } else {
      nextSquares[i] = 'O';
    }
    onPlay(nextSquares);
  }

  const winner = calculateWinner(squares);
  let status;
  if (winner) {
    status = 'Winner: ' + winner;
  } else {
    status = 'Next player: ' + (xIsNext ? 'X' : 'O');
  }

  return (
    <>
      <div className="status">{status}</div>
      <div className="board-row">
        <Square value={squares[0]} onSquareClick={() => handleClick(0)} />
        <Square value={squares[1]} onSquareClick={() => handleClick(1)} />
        <Square value={squares[2]} onSquareClick={() => handleClick(2)} />
      </div>
      <div className="board-row">
        <Square value={squares[3]} onSquareClick={() => handleClick(3)} />
        <Square value={squares[4]} onSquareClick={() => handleClick(4)} />
        <Square value={squares[5]} onSquareClick={() => handleClick(5)} />
      </div>
      <div className="board-row">
        <Square value={squares[6]} onSquareClick={() => handleClick(6)} />
        <Square value={squares[7]} onSquareClick={() => handleClick(7)} />
        <Square value={squares[8]} onSquareClick={() => handleClick(8)} />
      </div>
    </>
  );
}

export default function Game() {
  const [xIsNext, setXIsNext] = useState(true);
  const [history, setHistory] = useState([Array(9).fill(null)]);
  const currentSquares = history[history.length - 1];

  function handlePlay(nextSquares) {
    setHistory([...history, nextSquares]);
    setXIsNext(!xIsNext);
  }

  function jumpTo(nextMove) {
    // TODO
  }

  const moves = history.map((squares, move) => {
    let description;
    if (move > 0) {
      description = 'Go to move #' + move;
    } else {
      description = 'Go to game start';
    }
    return (
      <li>
        <button onClick={() => jumpTo(move)}>{description}</button>
      </li>
    );
  });

  return (
    <div className="game">
      <div className="game-board">
        <Board xIsNext={xIsNext} squares={currentSquares} onPlay={handlePlay} />
      </div>
      <div className="game-info">
        <ol>{moves}</ol>
      </div>
    </div>
  );
}

function calculateWinner(squares) {
  const lines = [
    [0, 1, 2],
    [3, 4, 5],
    [6, 7, 8],
    [0, 3, 6],
    [1, 4, 7],
    [2, 5, 8],
    [0, 4, 8],
    [2, 4, 6],
  ];
  for (let i = 0; i < lines.length; i++) {
    const [a, b, c] = lines[i];
    if (squares[a] && squares[a] === squares[b] && squares[a] === squares[c]) {
      return squares[a];
    }
  }
  return null;
}
As you iterate through history array inside the function you passed to map, the squares argument goes through each element of history, and the move argument goes through each array index: 0, 1, 2, …. (In most cases, you’d need the actual array elements, but to render a list of moves you will only need indexes.)
map으로 history 배열을 반복할 때 전달한 함수 내에서 squares 인수는 history의 각 요소를 통과하고, move 인수는 각 배열 인덱스를 통과합니다: 0, 1, 2, … (대부분의 경우 실제 배열 요소가 필요하지만, 이 경우에는 이동 목록을 렌더링하기 위해 squares를 사용하지 않습니다.)
For each move in the tic-tac-toe game’s history, you create a list item <li> which contains a button <button>. The button has an onClick handler which calls a function called jumpTo (that you haven’t implemented yet).
틱택토 게임 history의 각 이동에 대해 버튼 <button>이 포함된 목록 항목 <li>을 생성합니다. 버튼에는 (아직 구현하지 않은) jumpTo라는 함수를 호출하는 onClick 핸들러가 있습니다.
For now, you should see a list of the moves that occurred in the game and an error in the developer tools console. Let’s discuss what the “key” error means. 현재로서는 개발자 도구 콘솔에 게임에서 발생한 동작 목록과 오류가 표시되어야 합니다.
Picking a keyKey 선택하기
When you render a list, React stores some information about each rendered list item. When you update a list, React needs to determine what has changed. You could have added, removed, re-arranged, or updated the list’s items. 리스트를 렌더링할 때, React는 렌더링된 각 리스트 항목에 대한 몇 가지 정보를 저장합니다. 리스트를 업데이트할 때, React는 무엇이 변경되었는지 확인해야 합니다. 리스트의 항목은 추가, 제거, 재정렬 또는 업데이트 될 수 있습니다.
Imagine transitioning from 아래의 리스트가
<li>Alexa: 7 tasks left</li>
<li>Ben: 5 tasks left</li>
to 다음과 같이 변한다고 상상해 봅시다.
<li>Ben: 9 tasks left</li>
<li>Claudia: 8 tasks left</li>
<li>Alexa: 5 tasks left</li>
In addition to the updated counts, a human reading this would probably say that you swapped Alexa and Ben’s ordering and inserted Claudia between Alexa and Ben. However, React is a computer program and does not know what you intended, so you need to specify a key property for each list item to differentiate each list item from its siblings. If your data was from a database, Alexa, Ben, and Claudia’s database IDs could be used as keys. 우리는 아마 task의 개수가 업데이트되었을 뿐만 아니라 Alexa와 Ben의 순서가 바뀌고 Claudia가 두 사람 사이에 추가되었다고 생각할 것입니다. 그러나 React는 컴퓨터 프로그램이므로 우리가 의도한 바가 무엇인지 알지 못합니다. 그렇기 때문에 우리는 리스트의 항목에 key 프로퍼티를 지정하여 각 리스트의 항목이 다른 항목들과 다르다는 것을 구별해 주어야 합니다. 만약 데이터베이스에서 데이터를 불러와서 사용한다면 Alexa, Ben, Claudia의 데이터베이스 ID를 key로 사용할 수 있습니다.
<li key={user.id}>
  {user.name}: {user.taskCount} tasks left
</li>
When a list is re-rendered, React takes each list item’s key and searches the previous list’s items for a matching key. If the current list has a key that didn’t exist before, React creates a component. If the current list is missing a key that existed in the previous list, React destroys the previous component. If two keys match, the corresponding component is moved. 리스트가 다시 렌더링되면, React는 각 리스트 항목의 key를 가져와서 이전 리스트의 항목에서 일치하는 key를 탐색합니다. 현재 리스트에서 이전에 존재하지 않았던 key가 있으면, React는 컴포넌트를 생성합니다. 만약 현재 리스트에 이전 리스트에 존재했던 key를 가지고 있지 않다면 React는 그 key를 가진 컴포넌트를 제거합니다. 두 key가 일치한다면 해당 컴포넌트는 이동합니다.
Keys tell React about the identity of each component, which allows React to maintain state between re-renders. If a component’s key changes, the component will be destroyed and re-created with a new state. key는 각 React로 하여금 각 컴포넌트를 구별할수 있도록하여, 컴포넌트가 다시 렌더링 될 때 React가 해당 컴포넌트의 state를 유지할 수 있게 합니다. 컴포넌트의 key가 변하면, 컴포넌트는 제거되고 새로운 state와 함께 다시 생성됩니다.
key is a special and reserved property in React. When an element is created, React extracts the key property and stores the key directly on the returned element. Even though key may look like it is passed as props, React automatically uses key to decide which components to update. There’s no way for a component to ask what key its parent specified.
key는 React에서 특별하고 미리 지정된 프로퍼티입니다. 엘리먼트가 생성되면, React는 key 프로퍼티를 추출하여 반환되는 엘리먼트에 직접 key를 저장합니다. key가 props로 전달되는 것처럼 보일 수 있지만, React는 자동으로 key를 사용해 업데이트할 컴포넌트를 결정합니다. 부모가 지정한 key가 무엇인지 컴포넌트는 알 수 없습니다.
It’s strongly recommended that you assign proper keys whenever you build dynamic lists. If you don’t have an appropriate key, you may want to consider restructuring your data so that you do. 동적인 리스트를 만들 때마다 적절한 key를 할당하는 것을 강력하게 추천합니다. 적절한 key가 없는 경우, 데이터를 재구성하는 것을 고려해보세요.
If no key is specified, React will report an error and use the array index as a key by default. Using the array index as a key is problematic when trying to re-order a list’s items or inserting/removing list items. Explicitly passing key={i} silences the error but has the same problems as array indices and is not recommended in most cases.
key가 지정되지 않은 경우, React는 경고를 표시하며 배열의 인덱스를 기본 key로 사용합니다. 배열 인덱스를 key로 사용하면 리스트 항목의 순서를 바꾸거나 항목을 추가/제거 할 때 문제가 발생합니다. 명시적으로 key={i}를 전달하면 경고는 사라지지만 배열의 인덱스를 사용할 때와 동일한 문제가 발생하므로 대부분의 경우에 추천하지 않습니다.
Keys do not need to be globally unique; they only need to be unique between components and their siblings. key는 전역적으로 고유할 필요는 없으며 컴포넌트와 해당 컴포넌트의 형제 컴포넌트들 사이에서만 고유하면 됩니다.
Implementing time travel시간여행 구현하기
In the tic-tac-toe game’s history, each past move has a unique ID associated with it: it’s the sequential number of the move. Moves will never be re-ordered, deleted, or inserted in the middle, so it’s safe to use the move index as a key. 틱택토 게임의 history에서 과거의 각 이동에는 해당 이동의 일련 번호인 고유 ID가 있습니다. 이동은 중간에 순서를 바꾸거나 삭제하거나 삽입할 수 없으므로 이동 인덱스를 key로 사용하는 것이 안전합니다.
In the Game function, you can add the key as <li key={move}>, and if you reload the rendered game, React’s “key” error should disappear:
Game 함수에서 <li key={move}>로 key를 추가할 수 있으며, 렌더링된 게임을 다시 로드하면 React의 “key” 에러가 사라질 것입니다:
const moves = history.map((squares, move) => {
  //...
  return (
    <li key={move}>
      <button onClick={() => jumpTo(move)}>{description}</button>
    </li>
  );
});import { useState } from 'react'; function Square({ value, onSquareClick }) { return ( <button className="square" onClick={onSquareClick}> {value} </button> ); } function Board({ xIsNext, squares, onPlay }) { function handleClick(i) { if (calculateWinner(squares) || squares[i]) { return; } const nextSquares = squares.slice(); if (xIsNext) { nextSquares[i] = 'X'; } else { nextSquares[i] = 'O'; } onPlay(nextSquares); } const winner = calculateWinner(squares); let status; if (winner) { status = 'Winner: ' + winner; } else { status = 'Next player: ' + (xIsNext ? 'X' : 'O'); } return ( <> <div className="status">{status}</div> <div className="board-row"> <Square value={squares[0]} onSquareClick={() => handleClick(0)} /> <Square value={squares[1]} onSquareClick={() => handleClick(1)} /> <Square value={squares[2]} onSquareClick={() => handleClick(2)} /> </div> <div className="board-row"> <Square value={squares[3]} onSquareClick={() => handleClick(3)} /> <Square value={squares[4]} onSquareClick={() => handleClick(4)} /> <Square value={squares[5]} onSquareClick={() => handleClick(5)} /> </div> <div className="board-row"> <Square value={squares[6]} onSquareClick={() => handleClick(6)} /> <Square value={squares[7]} onSquareClick={() => handleClick(7)} /> <Square value={squares[8]} onSquareClick={() => handleClick(8)} /> </div> </> ); } export default function Game() { const [xIsNext, setXIsNext] = useState(true); const [history, setHistory] = useState([Array(9).fill(null)]); const currentSquares = history[history.length - 1]; function handlePlay(nextSquares) { setHistory([...history, nextSquares]); setXIsNext(!xIsNext); } function jumpTo(nextMove) { // TODO } const moves = history.map((squares, move) => { let description; if (move > 0) { description = 'Go to move #' + move; } else { description = 'Go to game start'; } return ( <li key={move}> <button onClick={() => jumpTo(move)}>{description}</button> </li> ); }); return ( <div className="game"> <div className="game-board"> <Board xIsNext={xIsNext} squares={currentSquares} onPlay={handlePlay} /> </div> <div className="game-info"> <ol>{moves}</ol> </div> </div> ); } function calculateWinner(squares) { const lines = [ [0, 1, 2], [3, 4, 5], [6, 7, 8], [0, 3, 6], [1, 4, 7], [2, 5, 8], [0, 4, 8], [2, 4, 6], ]; for (let i = 0; i < lines.length; i++) { const [a, b, c] = lines[i]; if (squares[a] && squares[a] === squares[b] && squares[a] === squares[c]) { return squares[a]; } } return null; }
Before you can implement jumpTo, you need the Game component to keep track of which step the user is currently viewing. To do this, define a new state variable called currentMove, defaulting to 0:
jumpTo를 구현하기 전에, 사용자가 현재 어떤 단계를 보고 있는지 추적할 수 있는 Game 컴포넌트가 필요합니다. 이를 위해 기본값이 0인 currentMove라는 새 state 변수를 정의합니다:
export default function Game() {
  const [xIsNext, setXIsNext] = useState(true);
  const [history, setHistory] = useState([Array(9).fill(null)]);
  const [currentMove, setCurrentMove] = useState(0);
  const currentSquares = history[history.length - 1];
  //...
}
Next, update the jumpTo function inside Game to update that currentMove. You’ll also set xIsNext to true if the number that you’re changing currentMove to is even.
다음으로, Game 내부의 jumpTo 함수를 업데이트하여 해당 currentMove를 업데이트합니다. 또한 currentMove를 변경하는 숫자가 짝수인 경우 xIsNext를 true로 설정합니다.
export default function Game() {
  // ...
  function jumpTo(nextMove) {
    setCurrentMove(nextMove);
    setXIsNext(nextMove % 2 === 0);
  }
  //...
}
You will now make two changes to the Game’s handlePlay function which is called when you click on a square.
이제 square를 클릭할 때 호출되는 Game의 handlePlay 함수 내용을 두 가지 변경합니다.
- If you “go back in time” and then make a new move from that point, you only want to keep the history up to that point. Instead of adding
nextSquaresafter all items (...spread syntax) inhistory, you’ll add it after all items inhistory.slice(0, currentMove + 1)so that you’re only keeping that portion of the old history. - Each time a move is made, you need to update
currentMoveto point to the latest history entry.
- ”시간을 거슬러 올라가서” 그 시점에서 새로운 이동을 하는 경우 해당 시점까지의 히스토리만 유지하고 싶을 것입니다.
history의 모든 항목(...전개 구문) 뒤에nextSquares를 추가하는 대신,history.slice(0, currentMove + 1)의 모든 항목 뒤에 추가하여 이전 history의 해당 부분만 유지하도록 할 수 있습니다. - 이동을 할 때마다 최신 history 항목을 가리키도록
currentMove를 업데이트해야 합니다.
function handlePlay(nextSquares) {
  const nextHistory = [...history.slice(0, currentMove + 1), nextSquares];
  setHistory(nextHistory);
  setCurrentMove(nextHistory.length - 1);
  setXIsNext(!xIsNext);
}
Finally, you will modify the Game component to render the currently selected move, instead of always rendering the final move:
마지막으로, 항상 최종 동작을 렌더링하는 대신 현재 선택한 동작을 렌더링하도록 Game 컴포넌트를 수정합니다:
export default function Game() {
  const [xIsNext, setXIsNext] = useState(true);
  const [history, setHistory] = useState([Array(9).fill(null)]);
  const [currentMove, setCurrentMove] = useState(0);
  const currentSquares = history[currentMove];

  // ...
}
If you click on any step in the game’s history, the tic-tac-toe board should immediately update to show what the board looked like after that step occurred. 게임 history의 특정 단계를 클릭하면 틱택토 보드가 즉시 업데이트되어, 해당 단계가 발생한 시점의 보드 모양이 표시됩니다.
import { useState } from 'react';

function Square({value, onSquareClick}) {
  return (
    <button className="square" onClick={onSquareClick}>
      {value}
    </button>
  );
}

function Board({ xIsNext, squares, onPlay }) {
  function handleClick(i) {
    if (calculateWinner(squares) || squares[i]) {
      return;
    }
    const nextSquares = squares.slice();
    if (xIsNext) {
      nextSquares[i] = 'X';
    } else {
      nextSquares[i] = 'O';
    }
    onPlay(nextSquares);
  }

  const winner = calculateWinner(squares);
  let status;
  if (winner) {
    status = 'Winner: ' + winner;
  } else {
    status = 'Next player: ' + (xIsNext ? 'X' : 'O');
  }

  return (
    <>
      <div className="status">{status}</div>
      <div className="board-row">
        <Square value={squares[0]} onSquareClick={() => handleClick(0)} />
        <Square value={squares[1]} onSquareClick={() => handleClick(1)} />
        <Square value={squares[2]} onSquareClick={() => handleClick(2)} />
      </div>
      <div className="board-row">
        <Square value={squares[3]} onSquareClick={() => handleClick(3)} />
        <Square value={squares[4]} onSquareClick={() => handleClick(4)} />
        <Square value={squares[5]} onSquareClick={() => handleClick(5)} />
      </div>
      <div className="board-row">
        <Square value={squares[6]} onSquareClick={() => handleClick(6)} />
        <Square value={squares[7]} onSquareClick={() => handleClick(7)} />
        <Square value={squares[8]} onSquareClick={() => handleClick(8)} />
      </div>
    </>
  );
}

export default function Game() {
  const [xIsNext, setXIsNext] = useState(true);
  const [history, setHistory] = useState([Array(9).fill(null)]);
  const [currentMove, setCurrentMove] = useState(0);
  const currentSquares = history[currentMove];

  function handlePlay(nextSquares) {
    const nextHistory = [...history.slice(0, currentMove + 1), nextSquares];
    setHistory(nextHistory);
    setCurrentMove(nextHistory.length - 1);
    setXIsNext(!xIsNext);
  }

  function jumpTo(nextMove) {
    setCurrentMove(nextMove);
    setXIsNext(nextMove % 2 === 0);
  }

  const moves = history.map((squares, move) => {
    let description;
    if (move > 0) {
      description = 'Go to move #' + move;
    } else {
      description = 'Go to game start';
    }
    return (
      <li key={move}>
        <button onClick={() => jumpTo(move)}>{description}</button>
      </li>
    );
  });

  return (
    <div className="game">
      <div className="game-board">
        <Board xIsNext={xIsNext} squares={currentSquares} onPlay={handlePlay} />
      </div>
      <div className="game-info">
        <ol>{moves}</ol>
      </div>
    </div>
  );
}

function calculateWinner(squares) {
  const lines = [
    [0, 1, 2],
    [3, 4, 5],
    [6, 7, 8],
    [0, 3, 6],
    [1, 4, 7],
    [2, 5, 8],
    [0, 4, 8],
    [2, 4, 6],
  ];
  for (let i = 0; i < lines.length; i++) {
    const [a, b, c] = lines[i];
    if (squares[a] && squares[a] === squares[b] && squares[a] === squares[c]) {
      return squares[a];
    }
  }
  return null;
}
Final cleanup최종 정리
If you look at the code very closely, you may notice that xIsNext === true when currentMove is even and xIsNext === false when currentMove is odd. In other words, if you know the value of currentMove, then you can always figure out what xIsNext should be.
코드를 자세히 살펴보면 currentMove가 짝수일 때는 xIsNext === true가 되고, currentMove가 홀수일 때는 xIsNext === false가 되는 것을 알 수 있습니다. 즉, currentMove의 값을 알고 있다면 언제나 xIsNext가 무엇인지 알아낼 수 있습니다.
There’s no reason for you to store both of these in state. In fact, always try to avoid redundant state. Simplifying what you store in state reduces bugs and makes your code easier to understand. Change Game so that it doesn’t store xIsNext as a separate state variable and instead figures it out based on the currentMove:
이 두 가지 state를 모두 저장할 이유가 없습니다. 항상 중복되는 state는 피하세요. state에 저장하는 것을 단순화하면 버그를 줄이고 코드를 더 쉽게 이해할 수 있습니다. Game을 변경하여 더 이상 xIsNext를 별도의 state 변수로 저장하지 않고, 대신 currentMove를 기반으로 알아내도록 합니다:
export default function Game() {
  const [history, setHistory] = useState([Array(9).fill(null)]);
  const [currentMove, setCurrentMove] = useState(0);
  const xIsNext = currentMove % 2 === 0;
  const currentSquares = history[currentMove];

  function handlePlay(nextSquares) {
    const nextHistory = [...history.slice(0, currentMove + 1), nextSquares];
    setHistory(nextHistory);
    setCurrentMove(nextHistory.length - 1);
  }

  function jumpTo(nextMove) {
    setCurrentMove(nextMove);
  }
  // ...
}
You no longer need the xIsNext state declaration or the calls to setXIsNext. Now, there’s no chance for xIsNext to get out of sync with currentMove, even if you make a mistake while coding the components.
더 이상 xIsNext state 선언이나 setXIsNext 호출이 필요하지 않습니다. 이제 컴포넌트를 코딩하는 동안 실수를 하더라도 xIsNext가 currentMove와 동기화되지 않을 가능성이 없습니다.
Wrapping up마무리
Congratulations! You’ve created a tic-tac-toe game that: 축하합니다! 여러분은 틱택토 게임을 만들었습니다:
- Lets you play tic-tac-toe,
- Indicates when a player has won the game,
- Stores a game’s history as a game progresses,
- Allows players to review a game’s history and see previous versions of a game’s board.
- 틱택토를 플레이합시다.
- 플레이어가 게임에서 이겼을 때를 표시합니다.
- 게임이 진행됨에 따라 게임 기록을 저장합니다.
- 플레이어가 게임 history를 검토하고 게임 보드의 이전 버전을 볼 수 있습니다.
Nice work! We hope you now feel like you have a decent grasp of how React works. 수고하셨습니다! 이제 React가 어떻게 작동하는지 어느 정도 이해하셨기를 바랍니다.
Check out the final result here: 최종 결과물을 여기에서 확인하세요:
import { useState } from 'react';

function Square({ value, onSquareClick }) {
  return (
    <button className="square" onClick={onSquareClick}>
      {value}
    </button>
  );
}

function Board({ xIsNext, squares, onPlay }) {
  function handleClick(i) {
    if (calculateWinner(squares) || squares[i]) {
      return;
    }
    const nextSquares = squares.slice();
    if (xIsNext) {
      nextSquares[i] = 'X';
    } else {
      nextSquares[i] = 'O';
    }
    onPlay(nextSquares);
  }

  const winner = calculateWinner(squares);
  let status;
  if (winner) {
    status = 'Winner: ' + winner;
  } else {
    status = 'Next player: ' + (xIsNext ? 'X' : 'O');
  }

  return (
    <>
      <div className="status">{status}</div>
      <div className="board-row">
        <Square value={squares[0]} onSquareClick={() => handleClick(0)} />
        <Square value={squares[1]} onSquareClick={() => handleClick(1)} />
        <Square value={squares[2]} onSquareClick={() => handleClick(2)} />
      </div>
      <div className="board-row">
        <Square value={squares[3]} onSquareClick={() => handleClick(3)} />
        <Square value={squares[4]} onSquareClick={() => handleClick(4)} />
        <Square value={squares[5]} onSquareClick={() => handleClick(5)} />
      </div>
      <div className="board-row">
        <Square value={squares[6]} onSquareClick={() => handleClick(6)} />
        <Square value={squares[7]} onSquareClick={() => handleClick(7)} />
        <Square value={squares[8]} onSquareClick={() => handleClick(8)} />
      </div>
    </>
  );
}

export default function Game() {
  const [history, setHistory] = useState([Array(9).fill(null)]);
  const [currentMove, setCurrentMove] = useState(0);
  const xIsNext = currentMove % 2 === 0;
  const currentSquares = history[currentMove];

  function handlePlay(nextSquares) {
    const nextHistory = [...history.slice(0, currentMove + 1), nextSquares];
    setHistory(nextHistory);
    setCurrentMove(nextHistory.length - 1);
  }

  function jumpTo(nextMove) {
    setCurrentMove(nextMove);
  }

  const moves = history.map((squares, move) => {
    let description;
    if (move > 0) {
      description = 'Go to move #' + move;
    } else {
      description = 'Go to game start';
    }
    return (
      <li key={move}>
        <button onClick={() => jumpTo(move)}>{description}</button>
      </li>
    );
  });

  return (
    <div className="game">
      <div className="game-board">
        <Board xIsNext={xIsNext} squares={currentSquares} onPlay={handlePlay} />
      </div>
      <div className="game-info">
        <ol>{moves}</ol>
      </div>
    </div>
  );
}

function calculateWinner(squares) {
  const lines = [
    [0, 1, 2],
    [3, 4, 5],
    [6, 7, 8],
    [0, 3, 6],
    [1, 4, 7],
    [2, 5, 8],
    [0, 4, 8],
    [2, 4, 6],
  ];
  for (let i = 0; i < lines.length; i++) {
    const [a, b, c] = lines[i];
    if (squares[a] && squares[a] === squares[b] && squares[a] === squares[c]) {
      return squares[a];
    }
  }
  return null;
}
If you have extra time or want to practice your new React skills, here are some ideas for improvements that you could make to the tic-tac-toe game, listed in order of increasing difficulty: 시간이 남거나 새로운 React 기술을 연습하고 싶다면, 틱택토 게임을 개선할 수 있는 몇 가지 아이디어를 난이도가 낮은 것부터 순서대로 나열해 보았습니다:
- For the current move only, show “You are at move #…” instead of a button.
- Rewrite
Boardto use two loops to make the squares instead of hardcoding them. - Add a toggle button that lets you sort the moves in either ascending or descending order.
- When someone wins, highlight the three squares that caused the win (and when no one wins, display a message about the result being a draw).
- Display the location for each move in the format (row, col) in the move history list.
- 현재 이동에 대해서만 버튼 대신 “당신은 이동 #에 있습니다…”를 표시합니다.
Board를 하드코딩하는 대신 두 개의 루프를 사용하여 사각형을 만들도록 다시 작성합니다.- 동작을 오름차순 또는 내림차순으로 정렬할 수 있는 토글 버튼을 추가합니다.
- 누군가 승리하면 승리의 원인이 된 세 개의 사각형을 강조 표시합니다(아무도 승리하지 않은 경우 무승부라는 메시지가 표시됨).
- 이동 기록 목록에서 각 이동의 위치를 형식(열, 행)으로 표시합니다.
Throughout this tutorial, you’ve touched on React concepts including elements, components, props, and state. Now that you’ve seen how these concepts work when building a game, check out Thinking in React to see how the same React concepts work when build an app’s UI. 이 튜토리얼을 통해 엘리먼트, 컴포넌트, props, state를 포함한 React의 개념에 대해 살펴봤습니다. 이제 이러한 개념들이 게임을 만들 때 어떻게 작동하는지 보았으니, Thinking in React를 통해 앱의 UI를 만들 때 동일한 React 개념이 어떻게 작동하는지 확인해 보세요.